
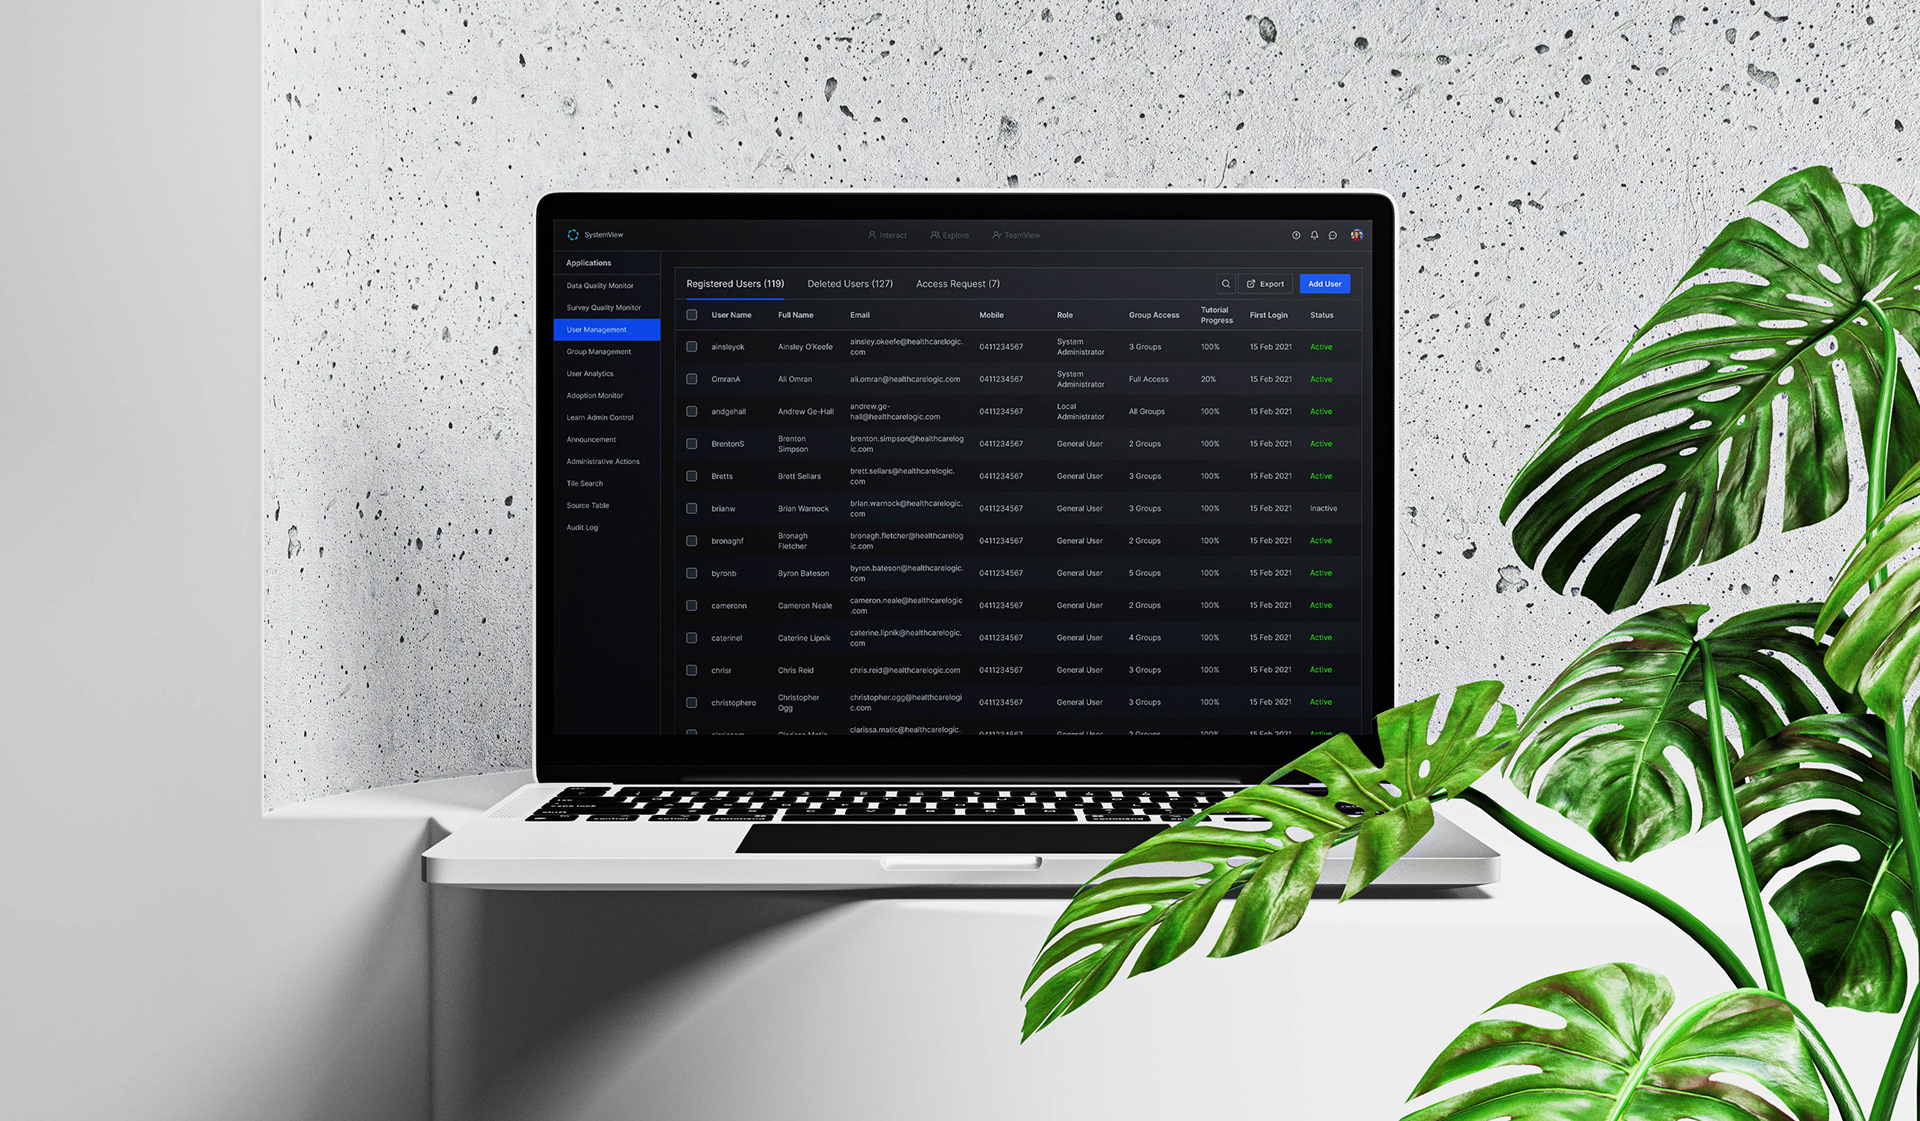
Project Overview
This case study explores a complex user data and accessibility that integrates role, states, and major user data. By streamlining workflows and accelerating data analysis, the platform aims to boost operational efficiency and empower faster user management.

Core Challenge
User data management rely on manual processes, outdated platforms, and complex user management process, causing workflow inefficiencies and complex user management.
Business Impact
Understanding the business impact of these challenges helped shape design decisions.
- Inefficient workflows → Increased operational costs and lower user engagement
- Complex access level → Inefficient user data access workflow
- Conflict group access → Unknown work level access conflict affects the data reliability
Research
To validate the problem, we conducted user interviews, internal surveys, and competitive analysis, focusing on growth and user retention challenges.
Key Findings
From the survey and interviews, we gathered five key insights during the discovery process.
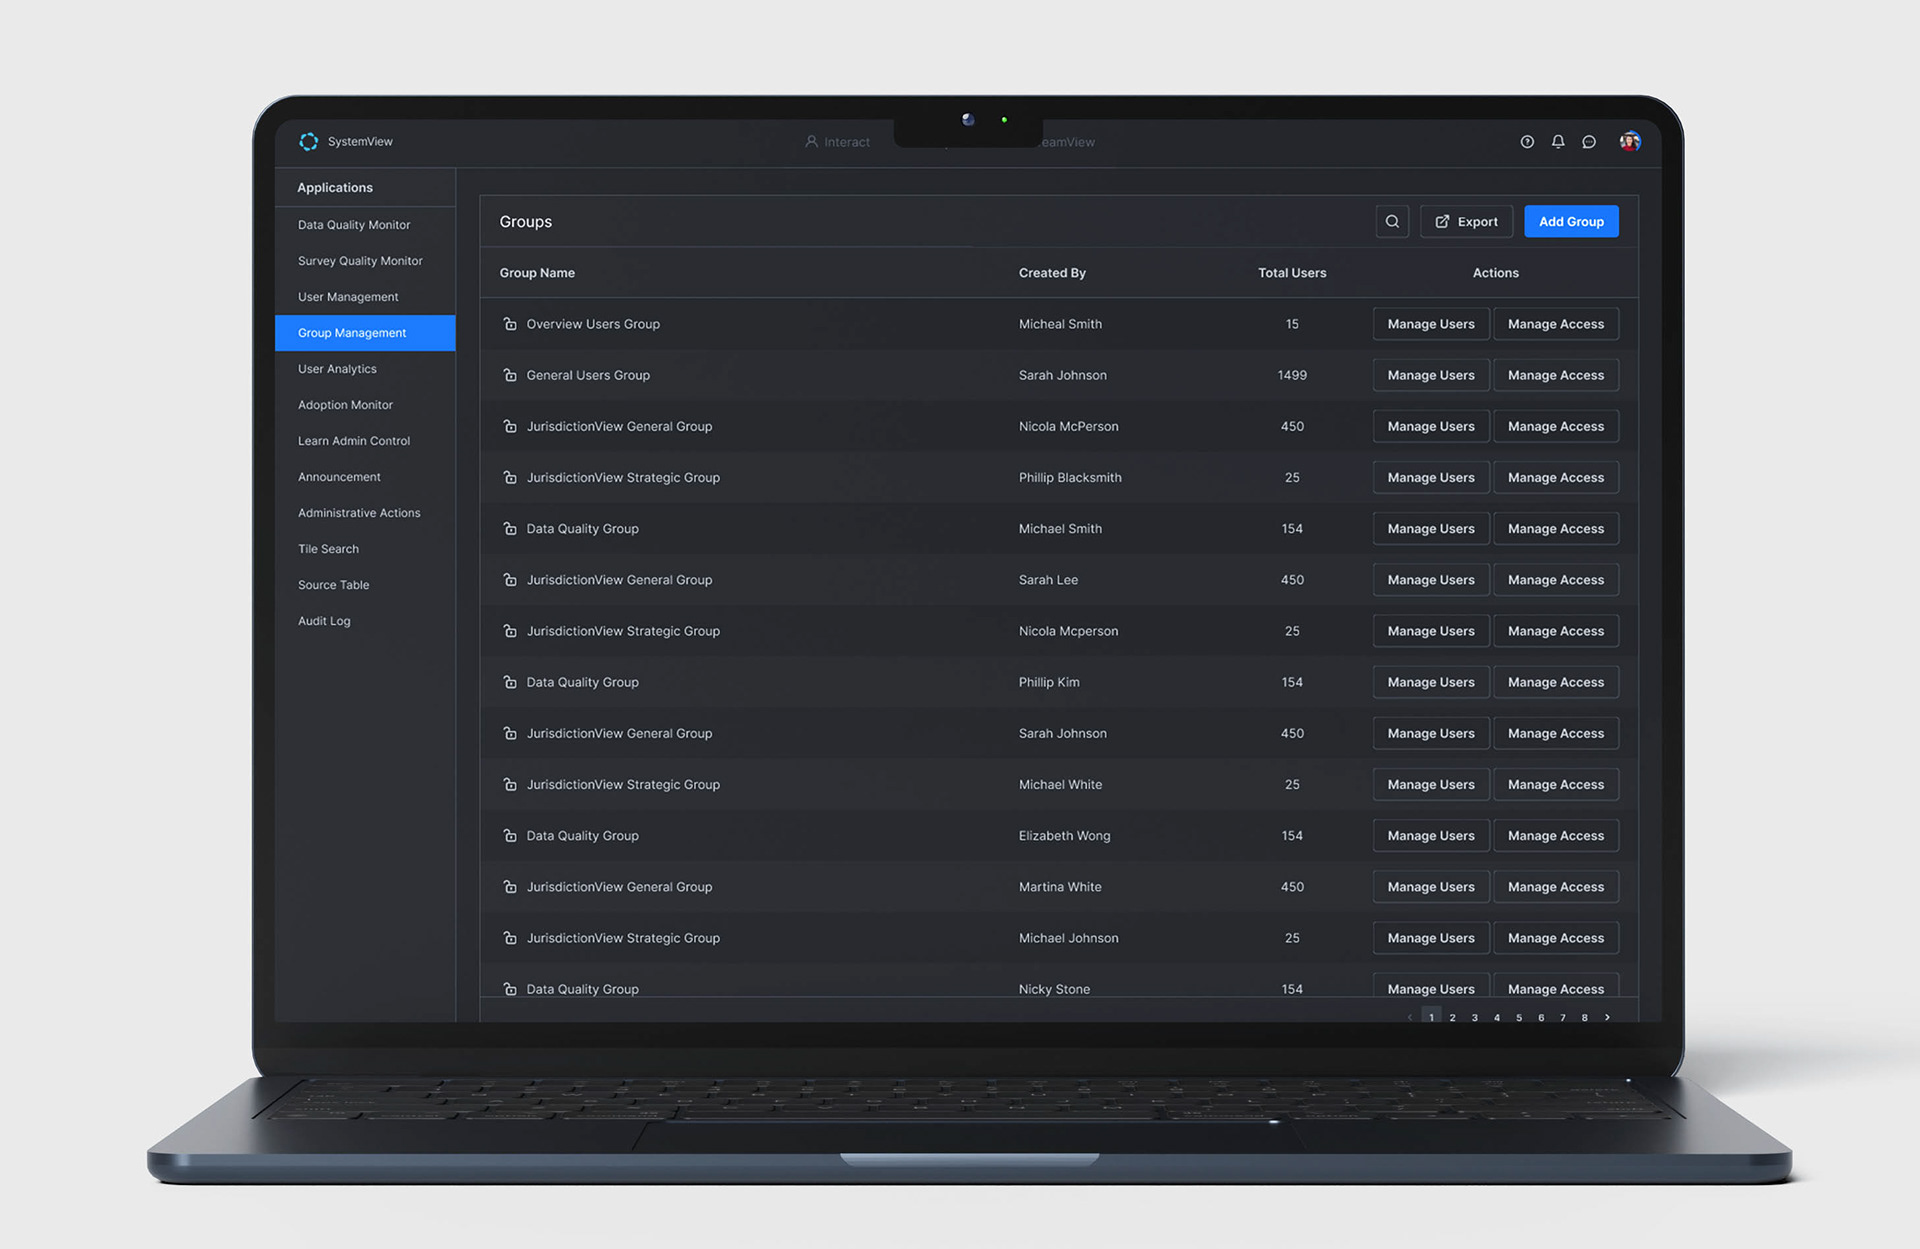
1. Decentralised User Management
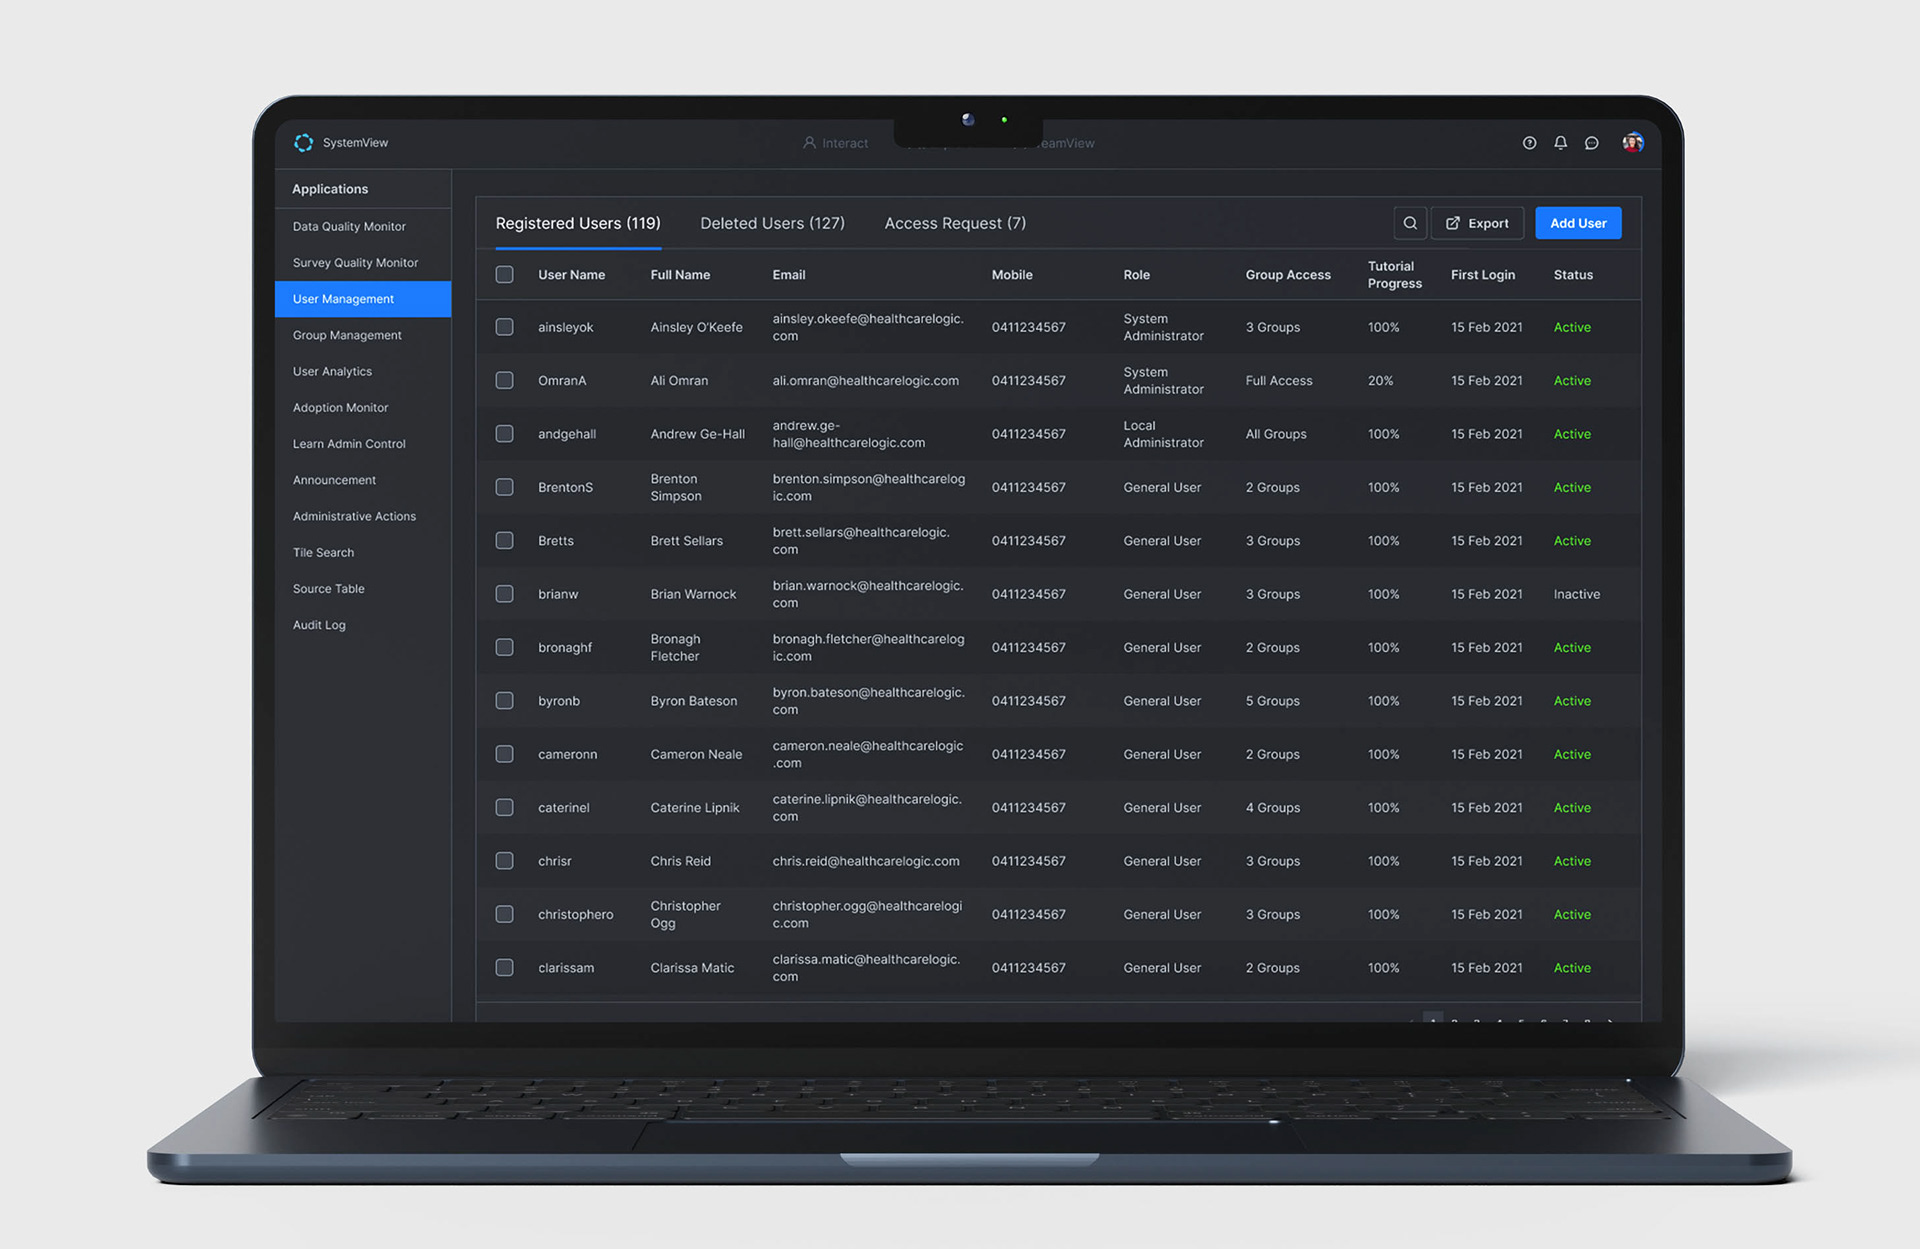
The User Management page combines user management, access control, group access, and system-generated access in one place. This overlap creates complexity and makes the system harder to maintain. In addition, access can also be modified through the administration panel, increasing the risk of data conflicts and inconsistencies.
2. Access Control Conflicts
Group access and management are handled under the broader user management and access control within the administration module. However, access control users (likely CST) have the ability to modify group access, which has led to data conflicts.
3. Complex Access Level
System-generated access levels should not be editable, yet system/local admins can currently modify them. These must be managed separately from group access to prevent conflicts.
4. Time-Consuming User Management
Updating user lists is inefficient, as identical changes must be applied to multiple users individually. This manual process is repetitive and slows down management tasks.
5. Inconsistent UX/UI
The interaction flows for viewing, editing, accessing, and deleting are inconsistent, leading to user confusion and errors. Additionally, the use of sub-menus as tabs is not aligned with other pages, creating a fragmented experience. This inconsistency reduces usability, increases training needs, and impacts overall efficiency.
Discover the workflow and define the problems
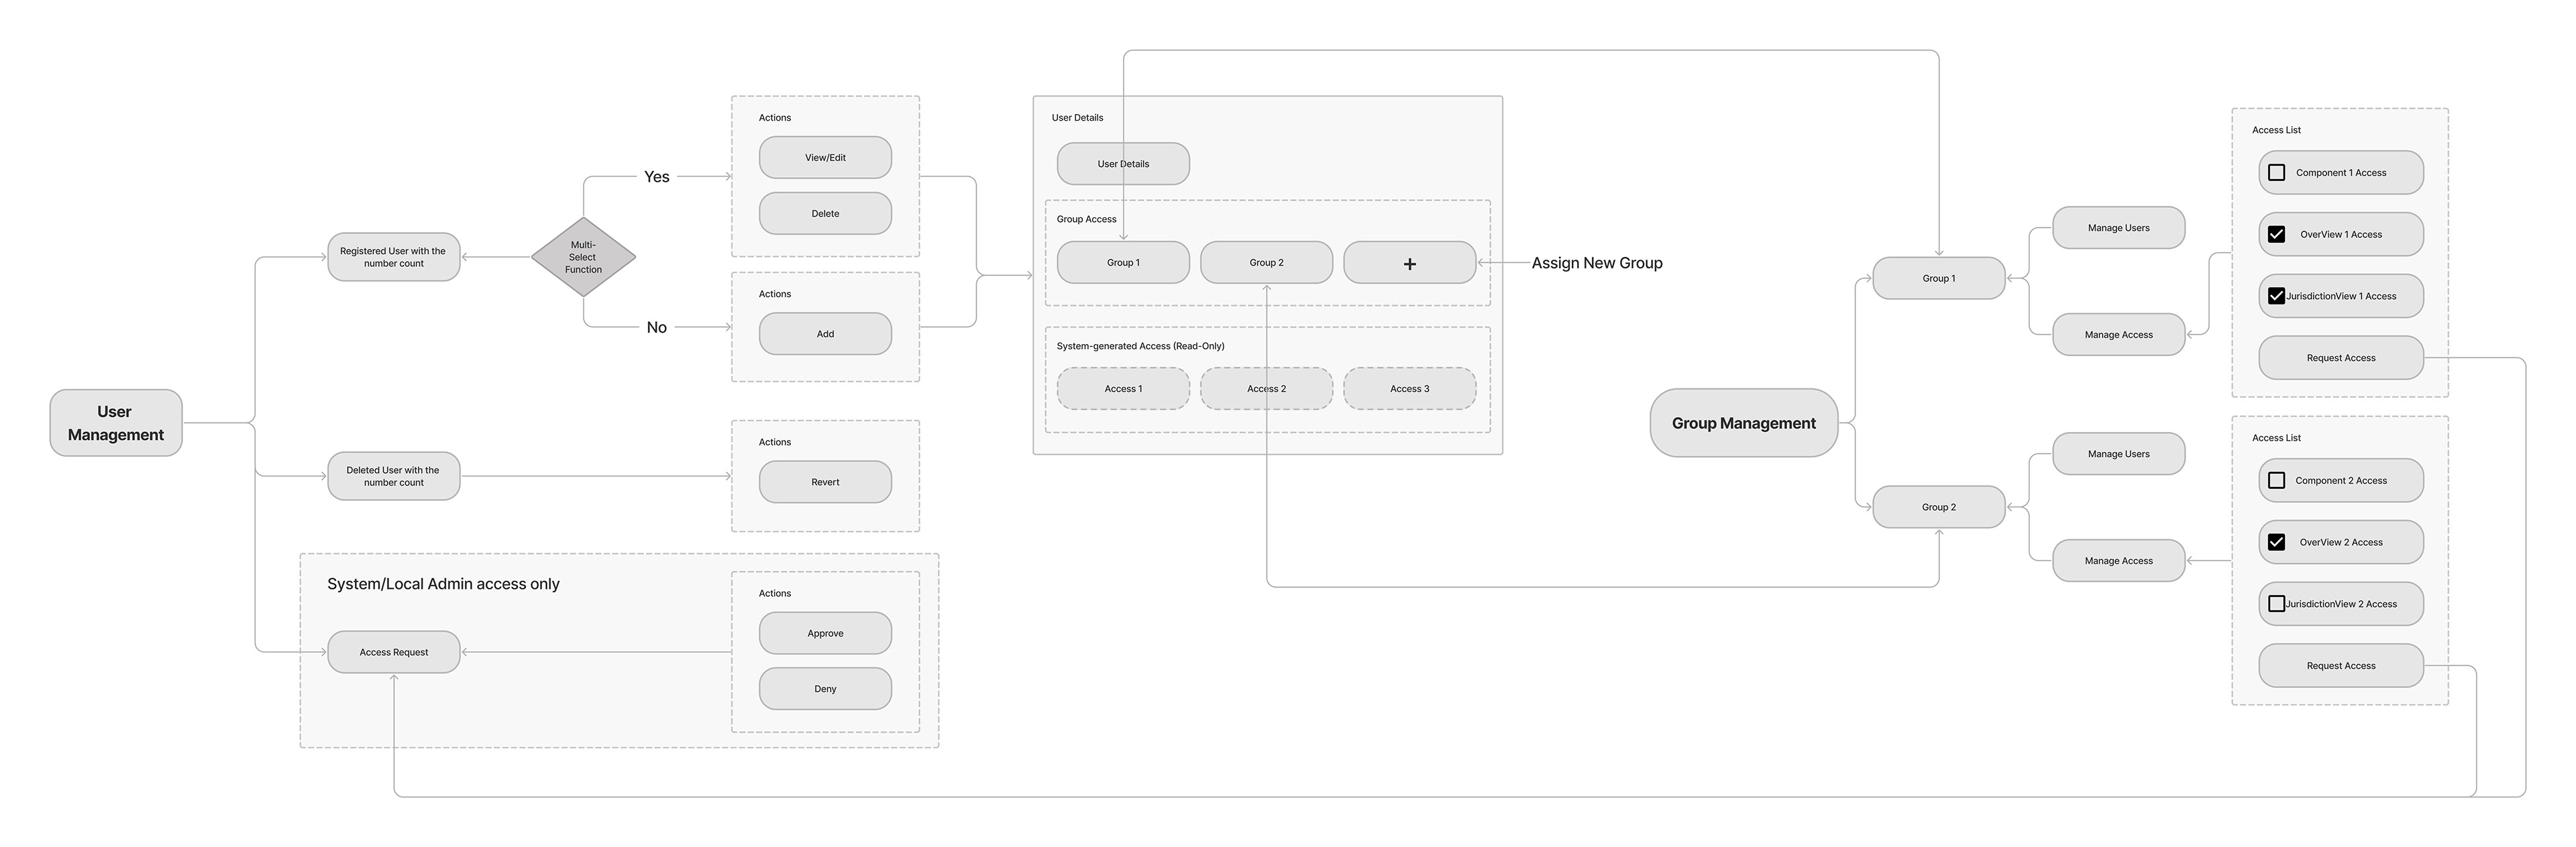
The next step was to discover the user flow of the user management. The diagram below shows combined user management, access control, group access, and system-generated access in one place.
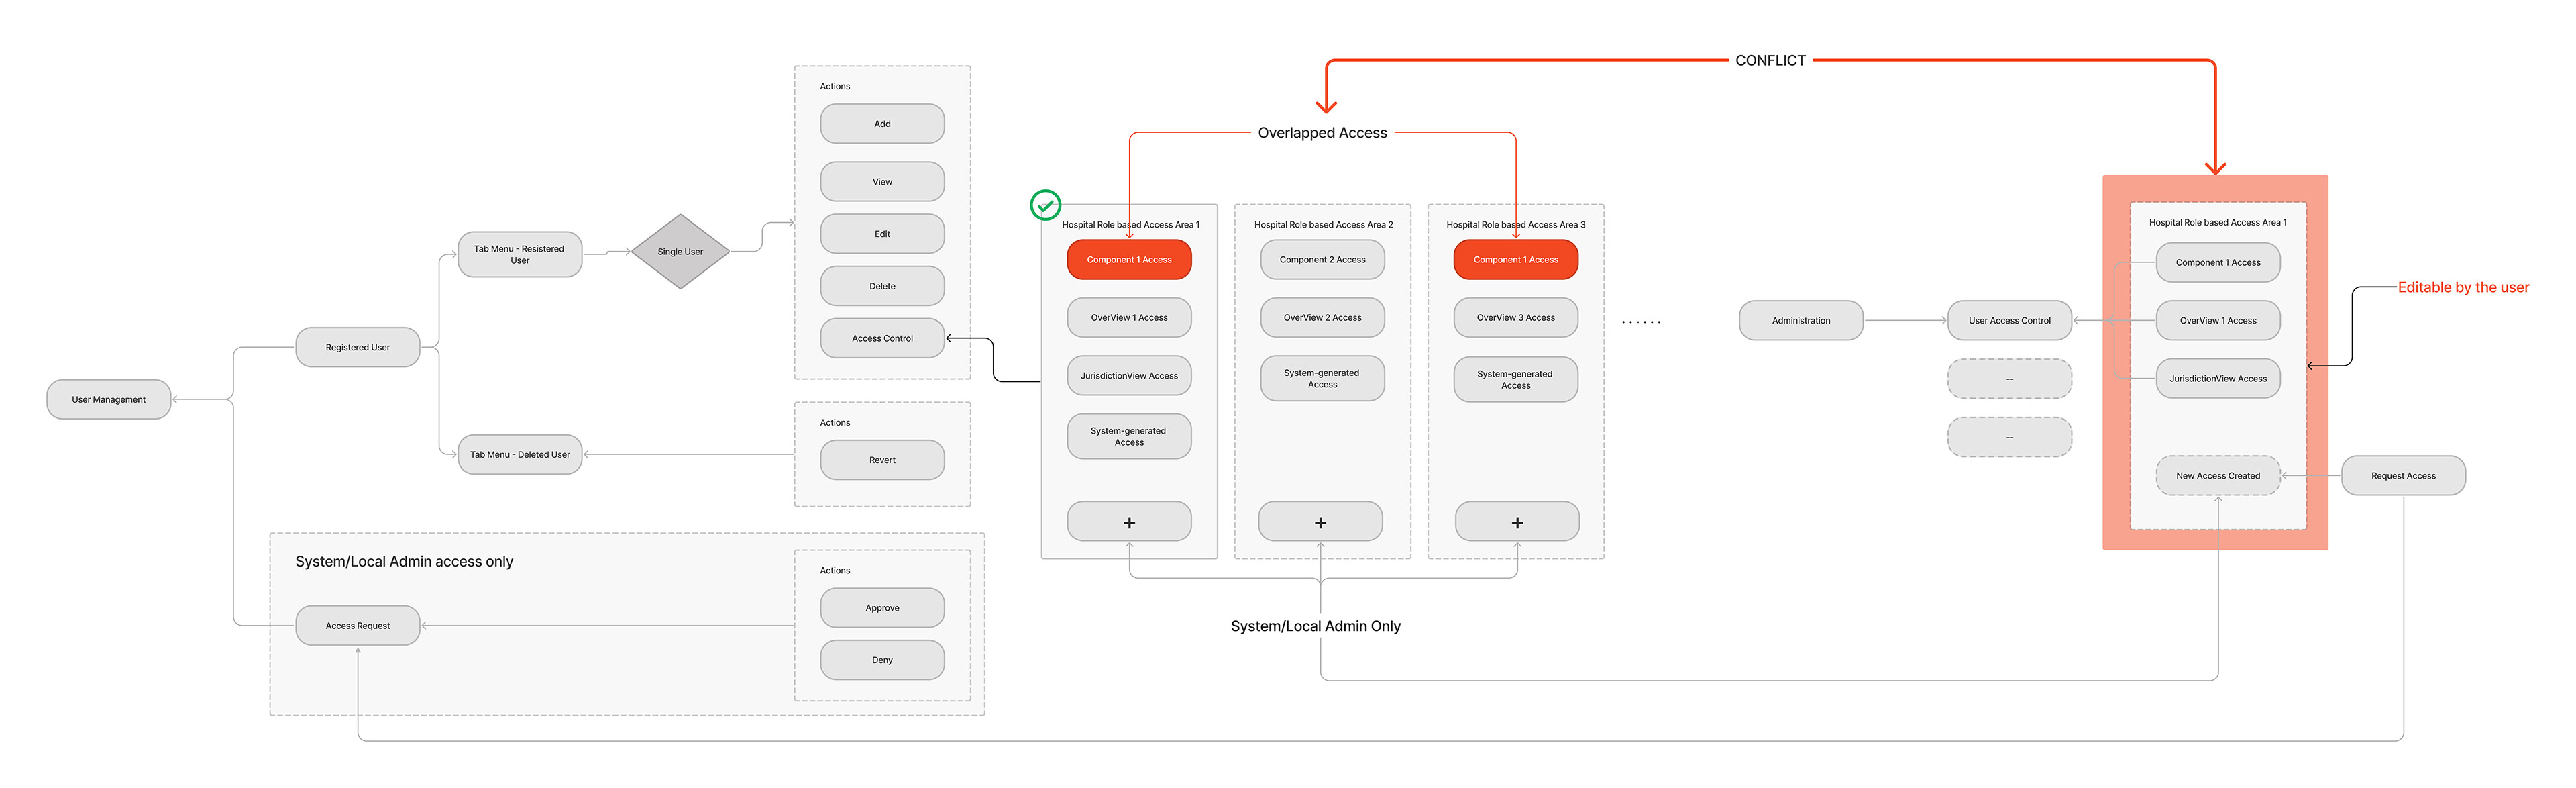
Current User Flow - User Management and Group Access
Information Architect Diagram
With the diagram, we were able to identify the problems in the workflow where access controls conflict.
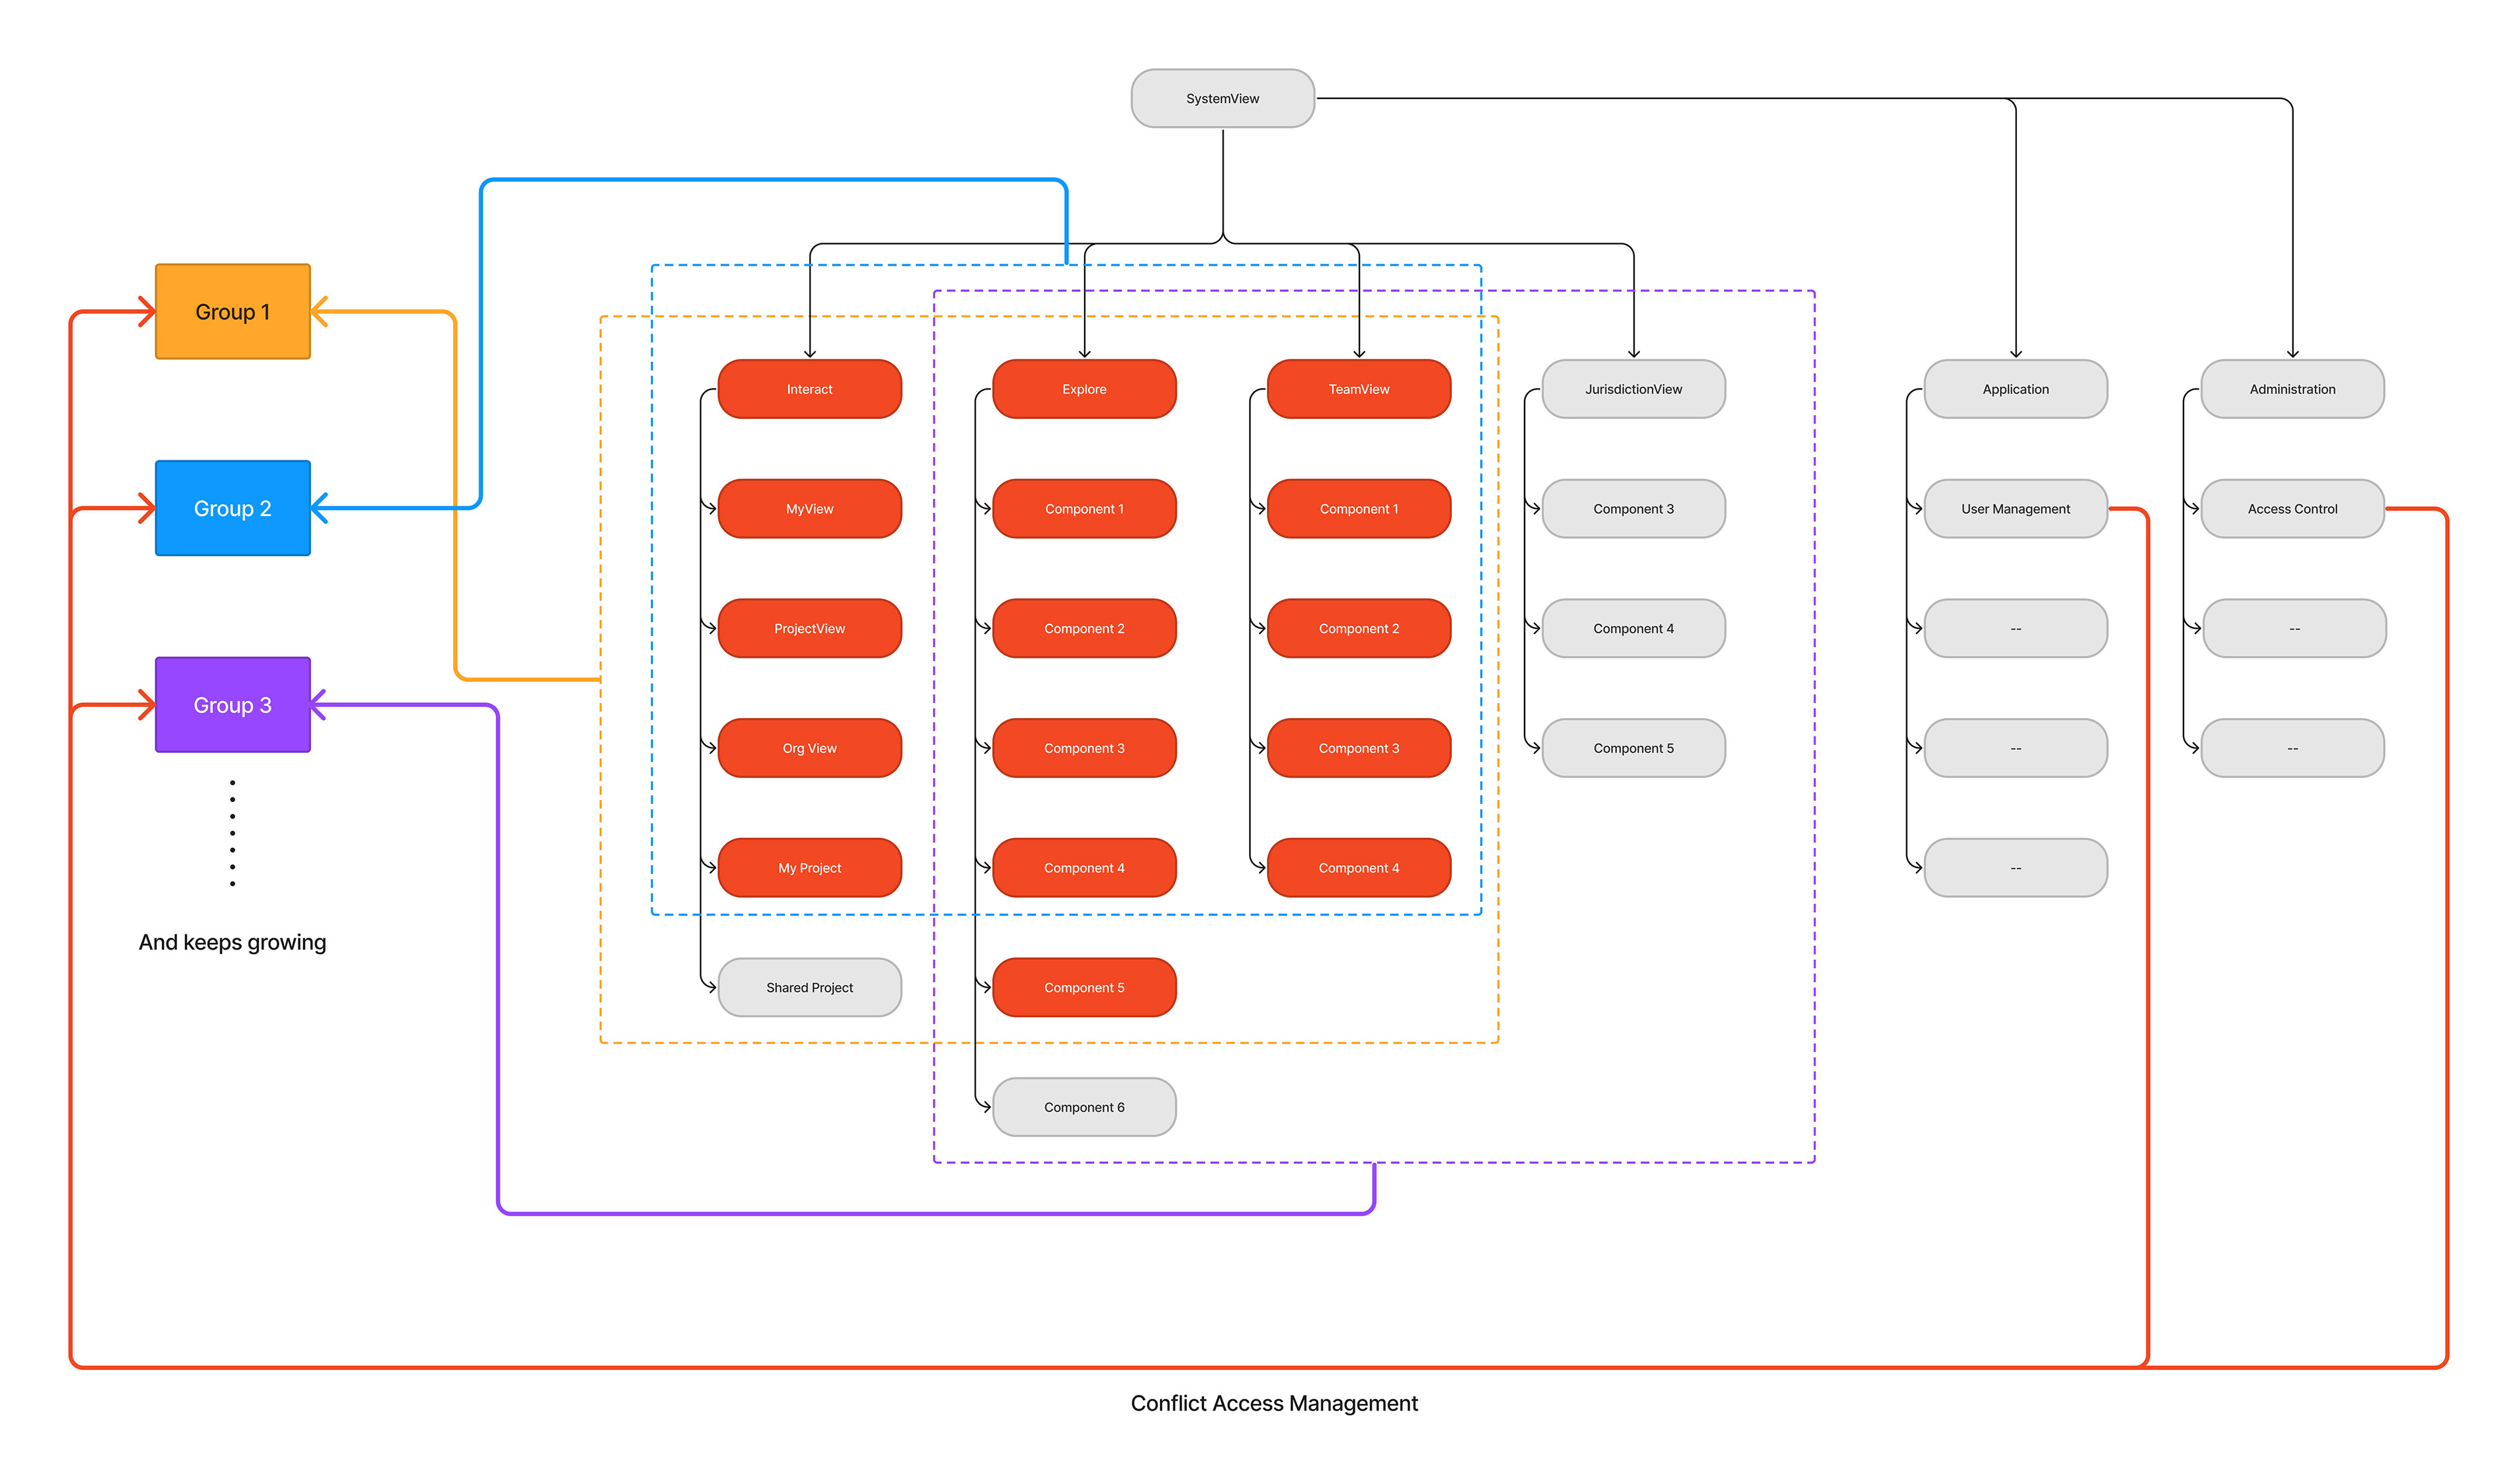
Information Architecture (IA) Diagram - Overlapped Access discovered during the UX research
The Solutions
Revised User Management UI/UX
New Group Management UI/UX
User Testing, User Flow Review Outcome
Revised User Flow - User Management and Group Access
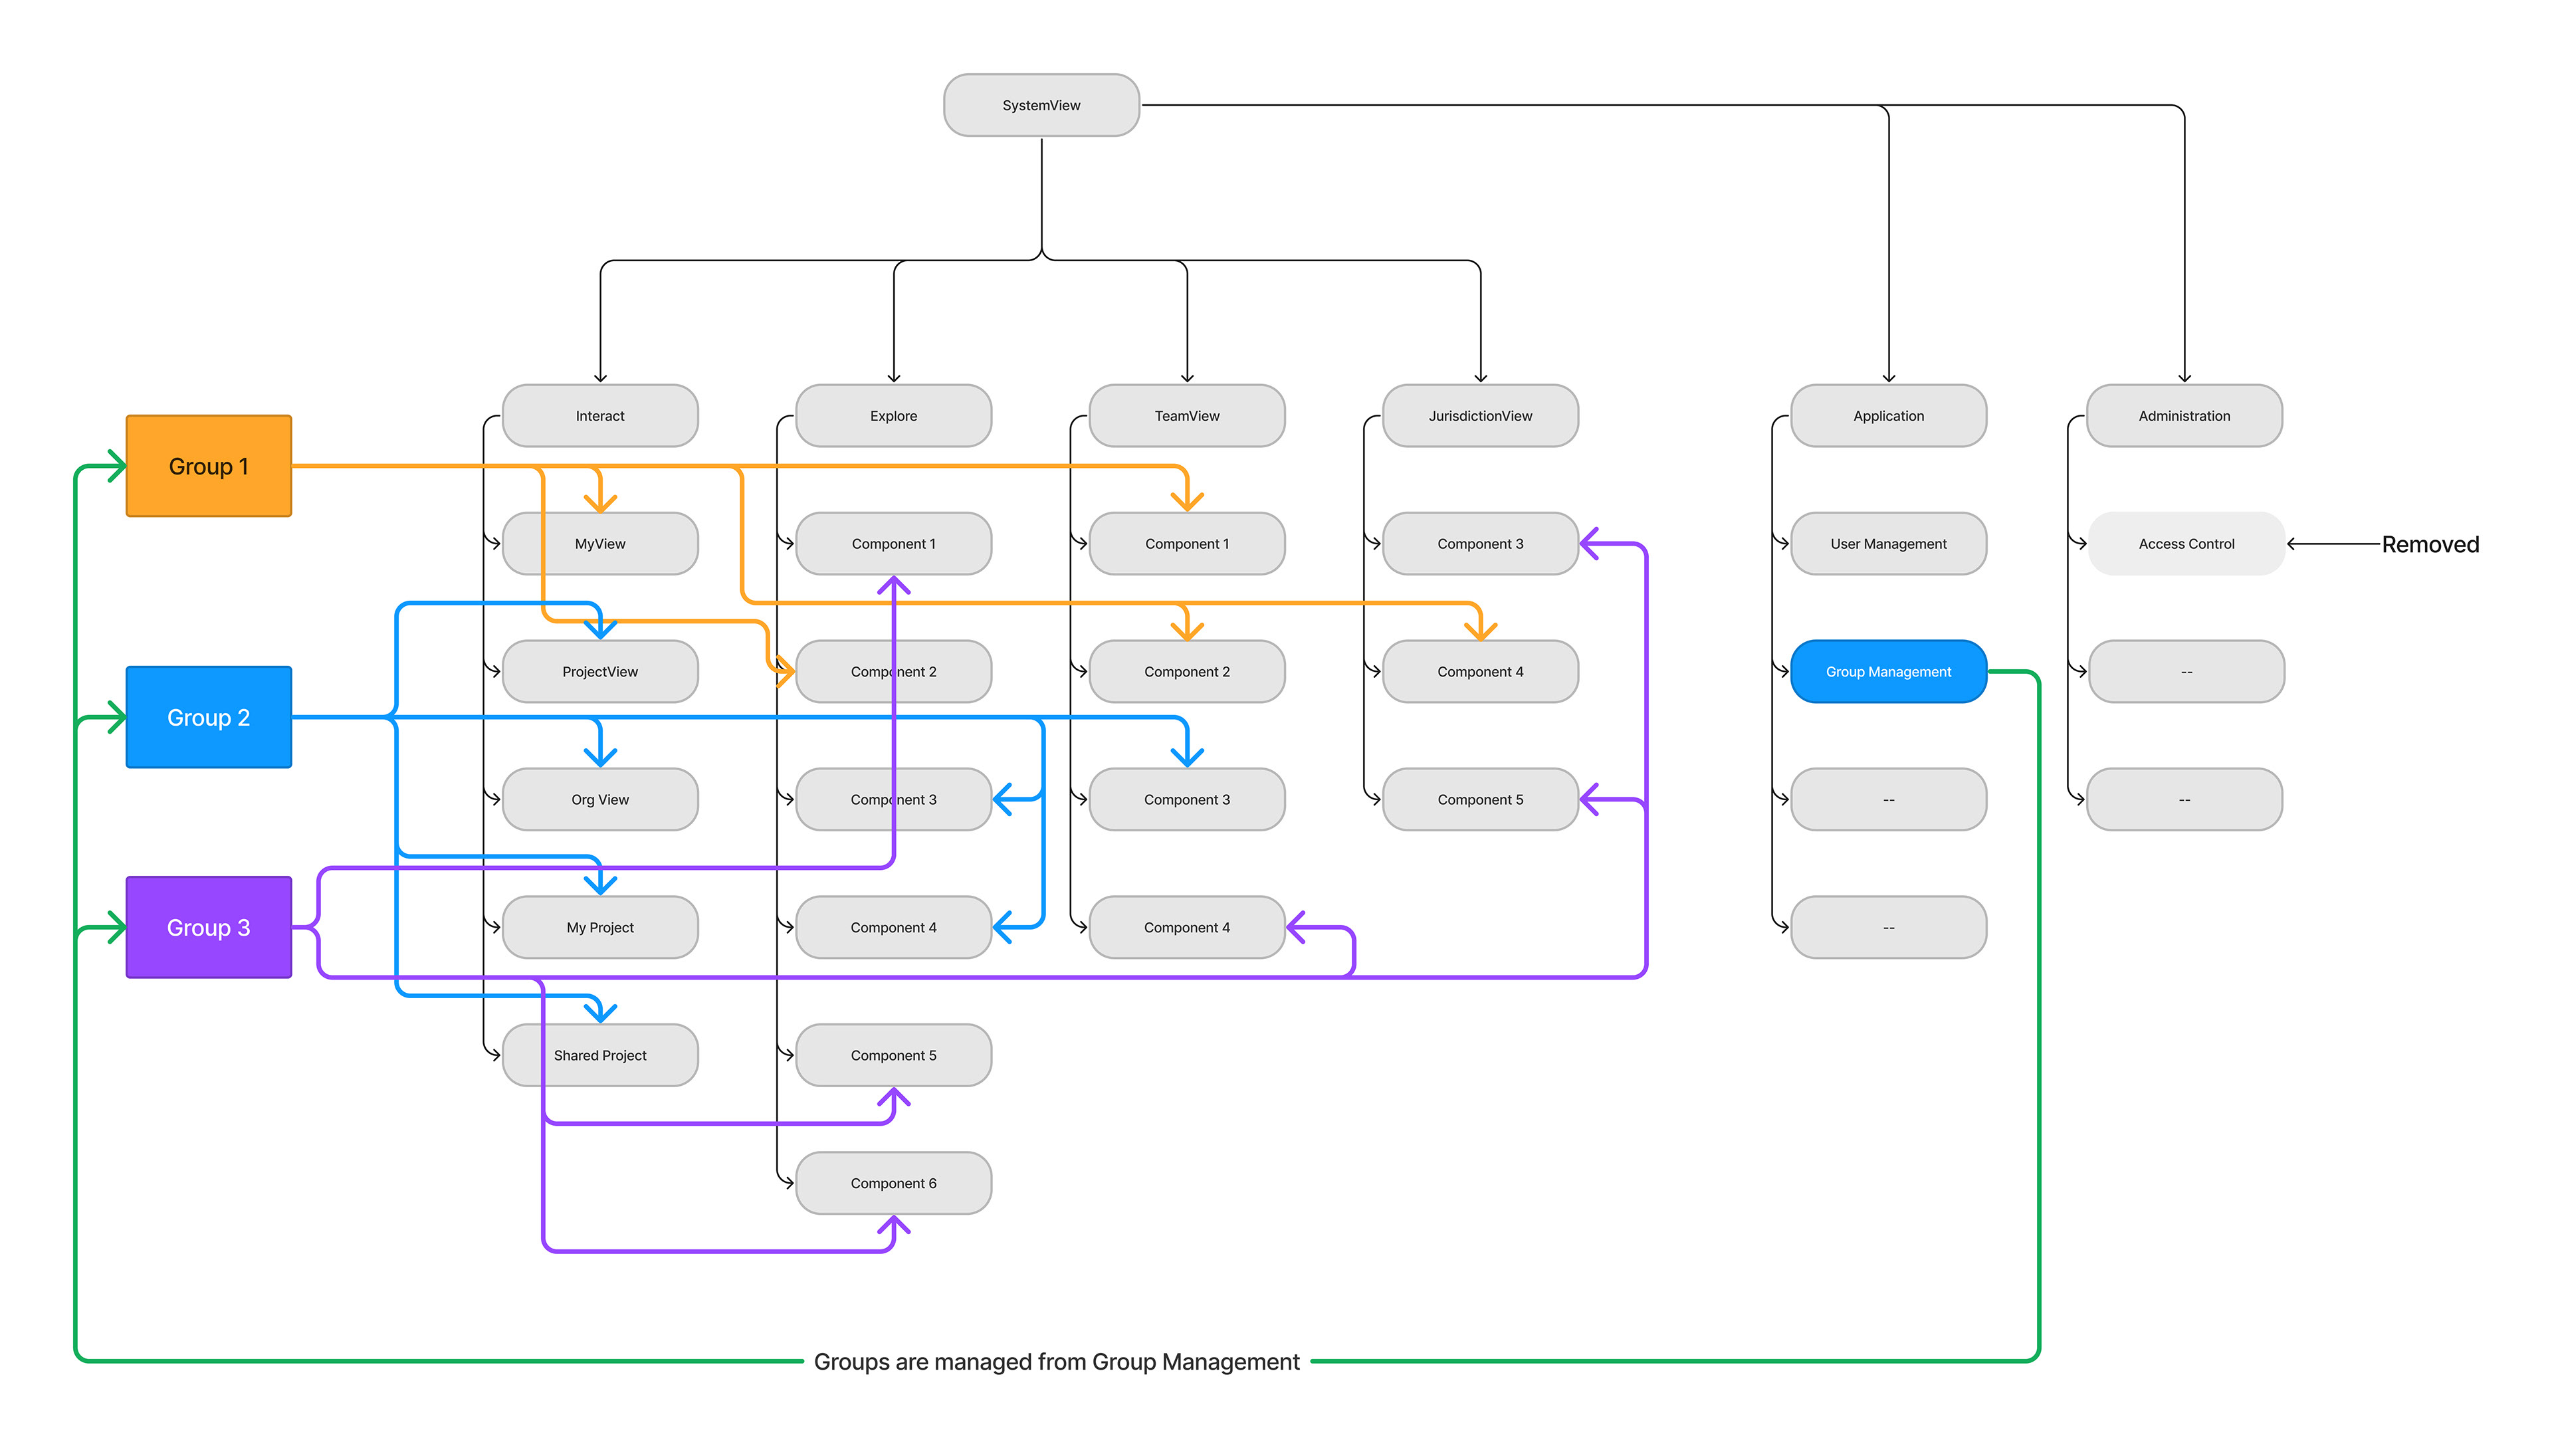
Information Architecture (IA) Diagram - Redefined Group Access
Solution Statement
1. Simplify the User Management
Research shows that users expect this page to focus solely on user management. Combining group and access management within the same page creates unnecessary complexity.
2. Establish Dedicated Group Management
User Management should focus solely on maintaining the user list, including updating, viewing user details, and providing a read-only access view. Group Management should be a separate function, dedicated to managing groups, their members, and associated access controls.
3. Define Updatable vs. Read-Only Data
To prevent data conflicts caused by multiple access points, clearly separate which fields are updatable and which should be displayed as read-only.
4. Multi-Select Functionality
Enabling multi-select in User Management will support bulk updates when needed, with action buttons dynamically adjusting based on the selected users.
5. Access Groups
Access Groups should only be managed within the Group Management page. In User Management, users can only be assigned to existing groups. System administrators, however, retain unrestricted control to manage access groups assigned to any user.
6. System-Generated Access
Certain default access groups should remain unchanged. These System-Generated Groups are “locked” and can only be modified by the Super System Administrator. In the UI, a lock icon will indicate that the group is read-only and not editable.
7. Consistent UI/UX
Ensure a consistent interface across both pages and align popup styles to support a user-centred design and improve usability.
Design Details
1. Consistent, User-Centred UI
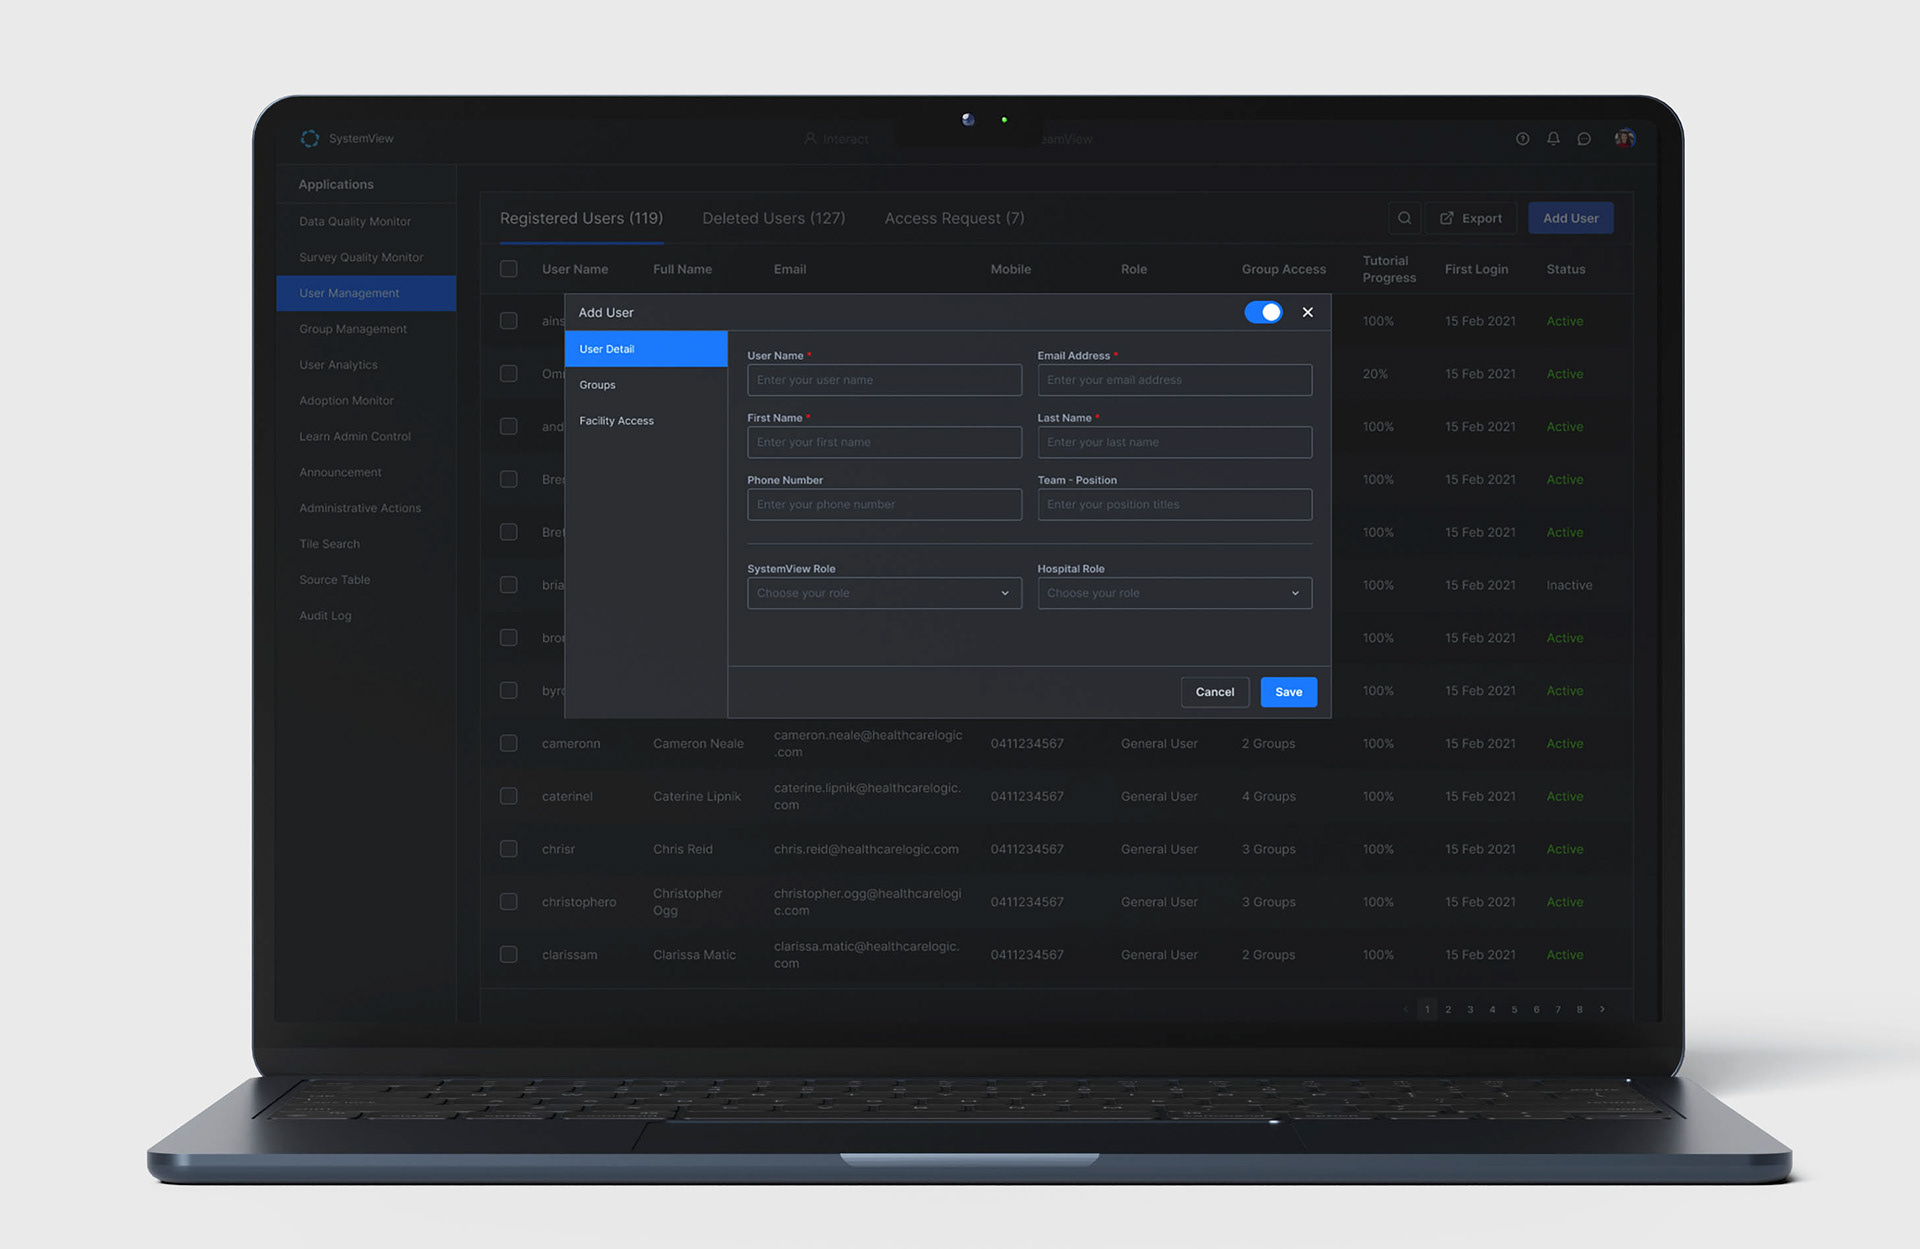
Add a new user popup
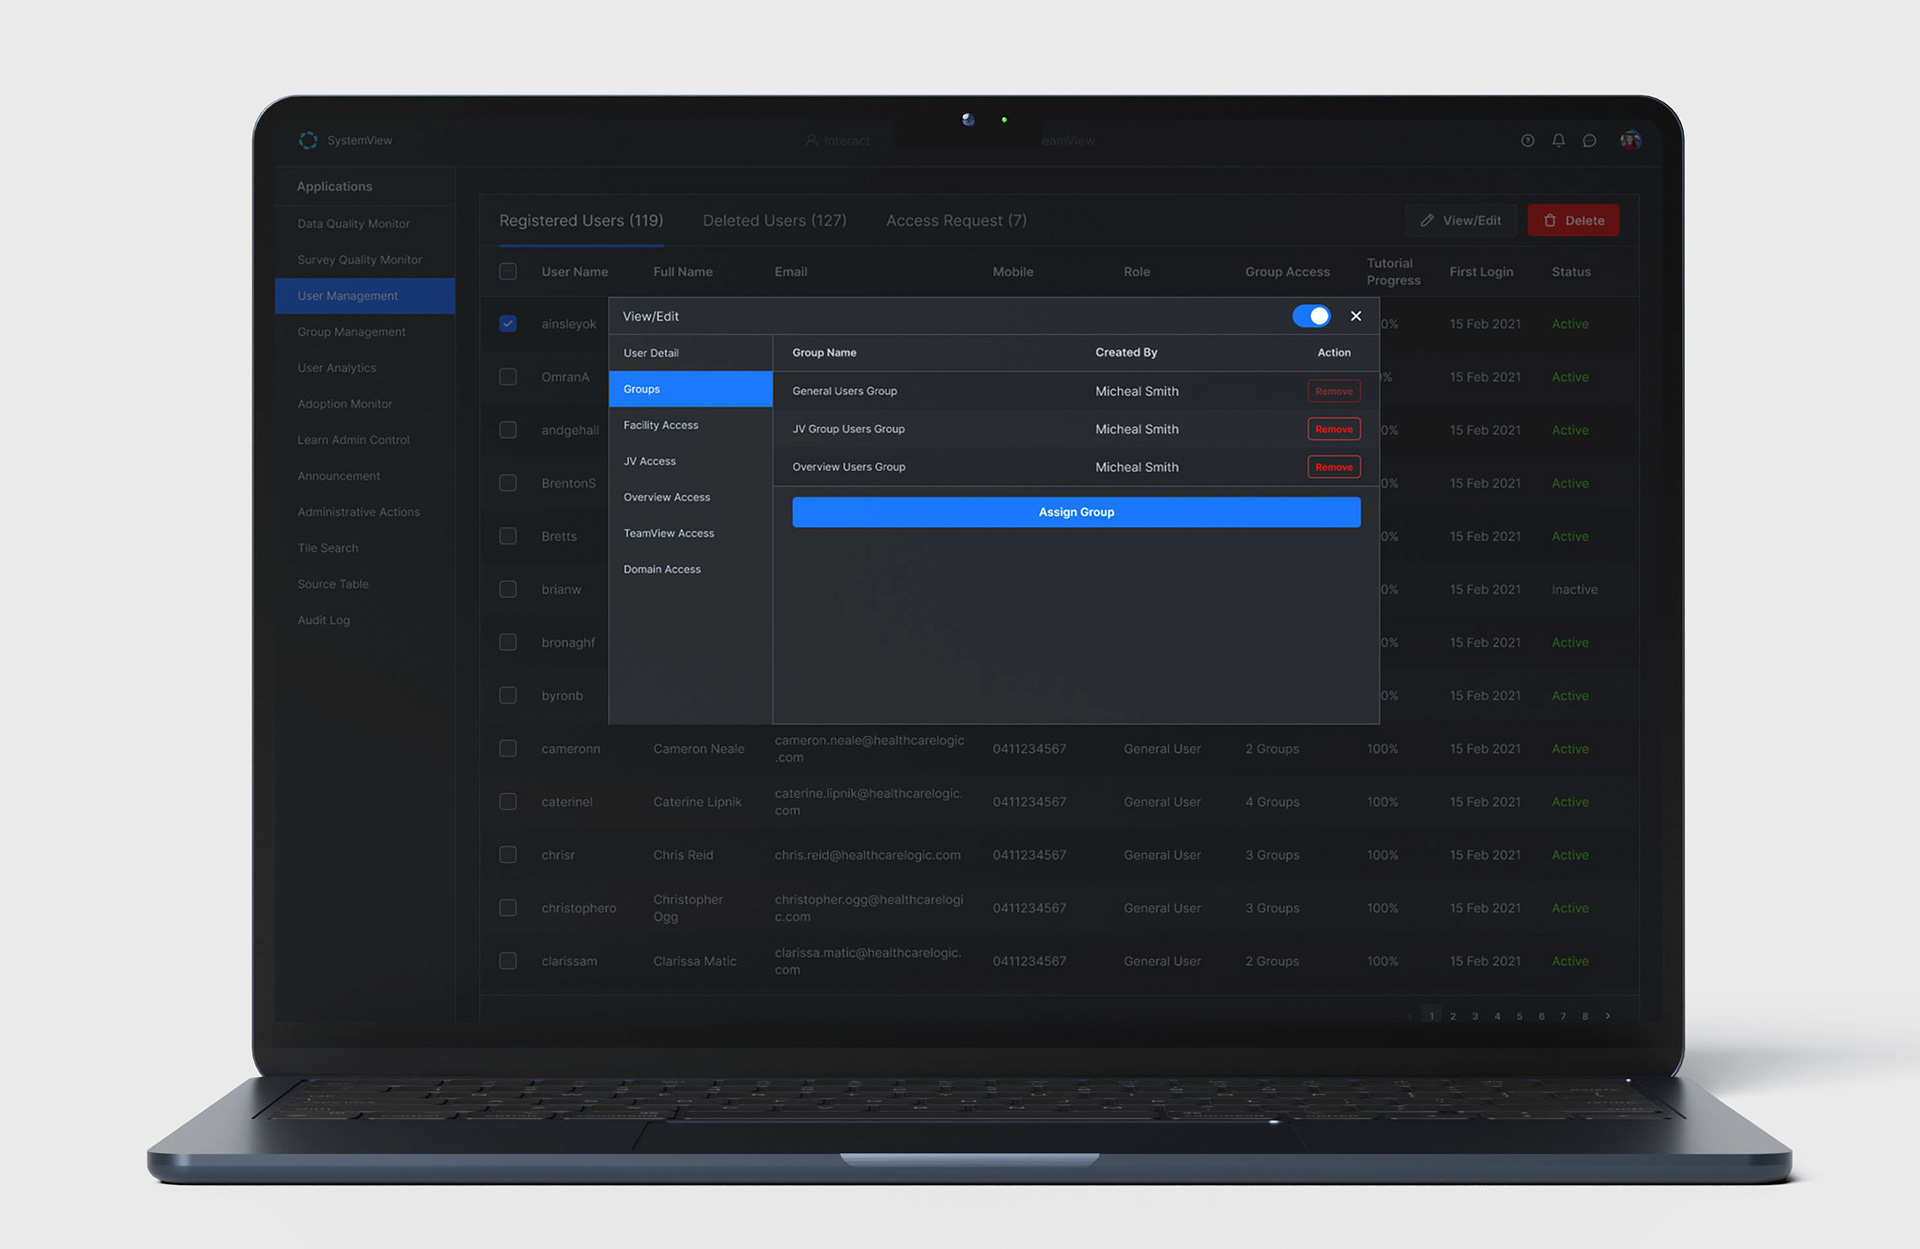
Consolidated View/Edit into a single menu
1. Apply Design System: Use the provided design system to ensure a consistent UI experience across all pages.
2. Standardise Interactions: Place related action buttons (Add, View/Edit, Delete) in the top-right corner and use a uniform pop-up layout to create a predictable, user-friendly experience.
3. Read-Only System-Generated Data: Display system-generated information (JV, Overview, TeamView, Domain Access) only in the View/Edit section as read-only to prevent accidental modifications.
4. Centralise Access Management: Control JV, Overview, TeamView, and Domain Access exclusively through Group Management, with access limited to System and designated Local Admins via the Manage Access menu.
5. Combine View/Edit Popups: Merge view and edit functionality into a single popup to streamline workflows and reduce redundancy.
Benefit: Enhances usability, enforces data integrity, and simplifies administrative tasks.
2. Multi or Single Select Functionality
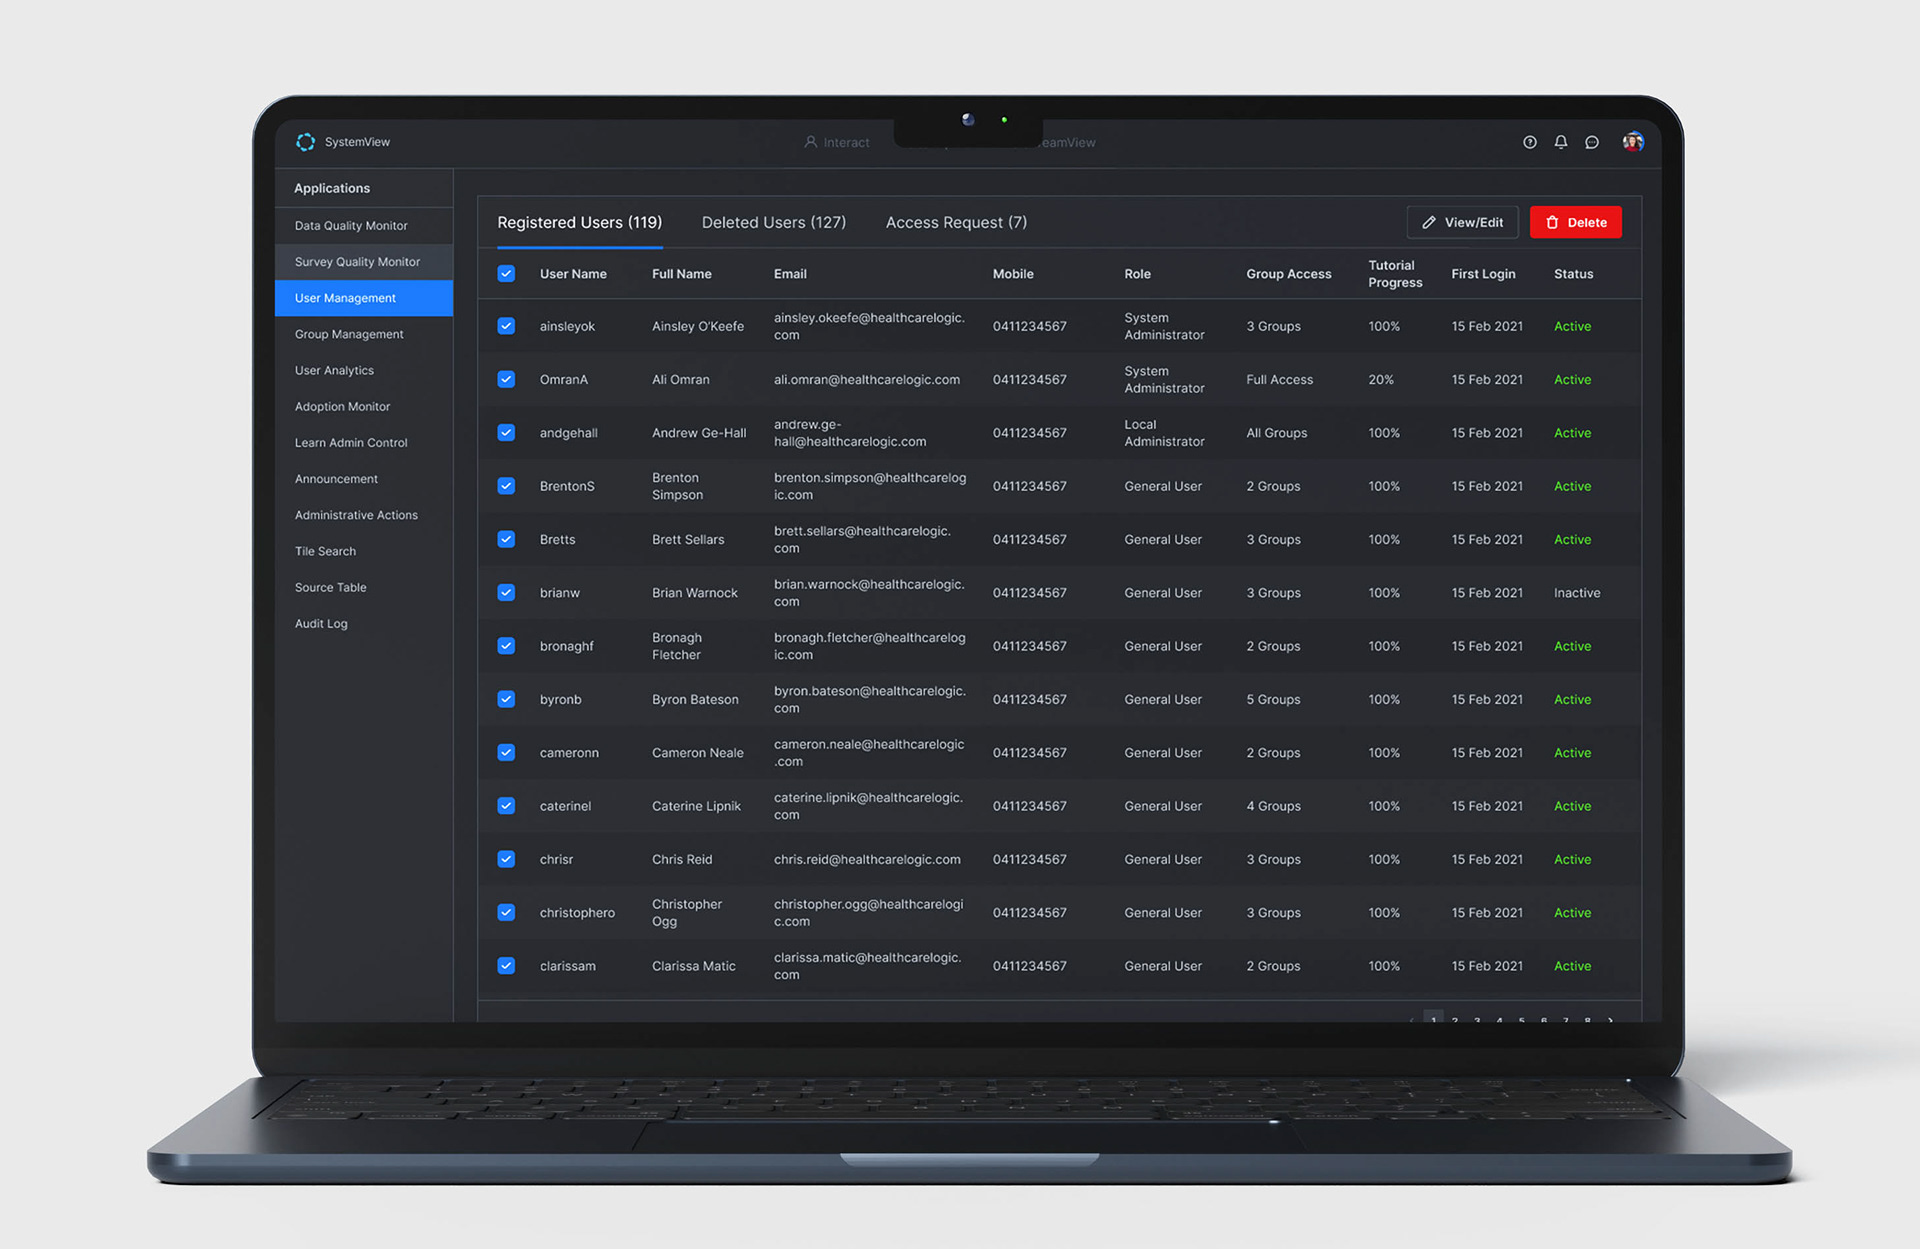
Multi-select user list feature
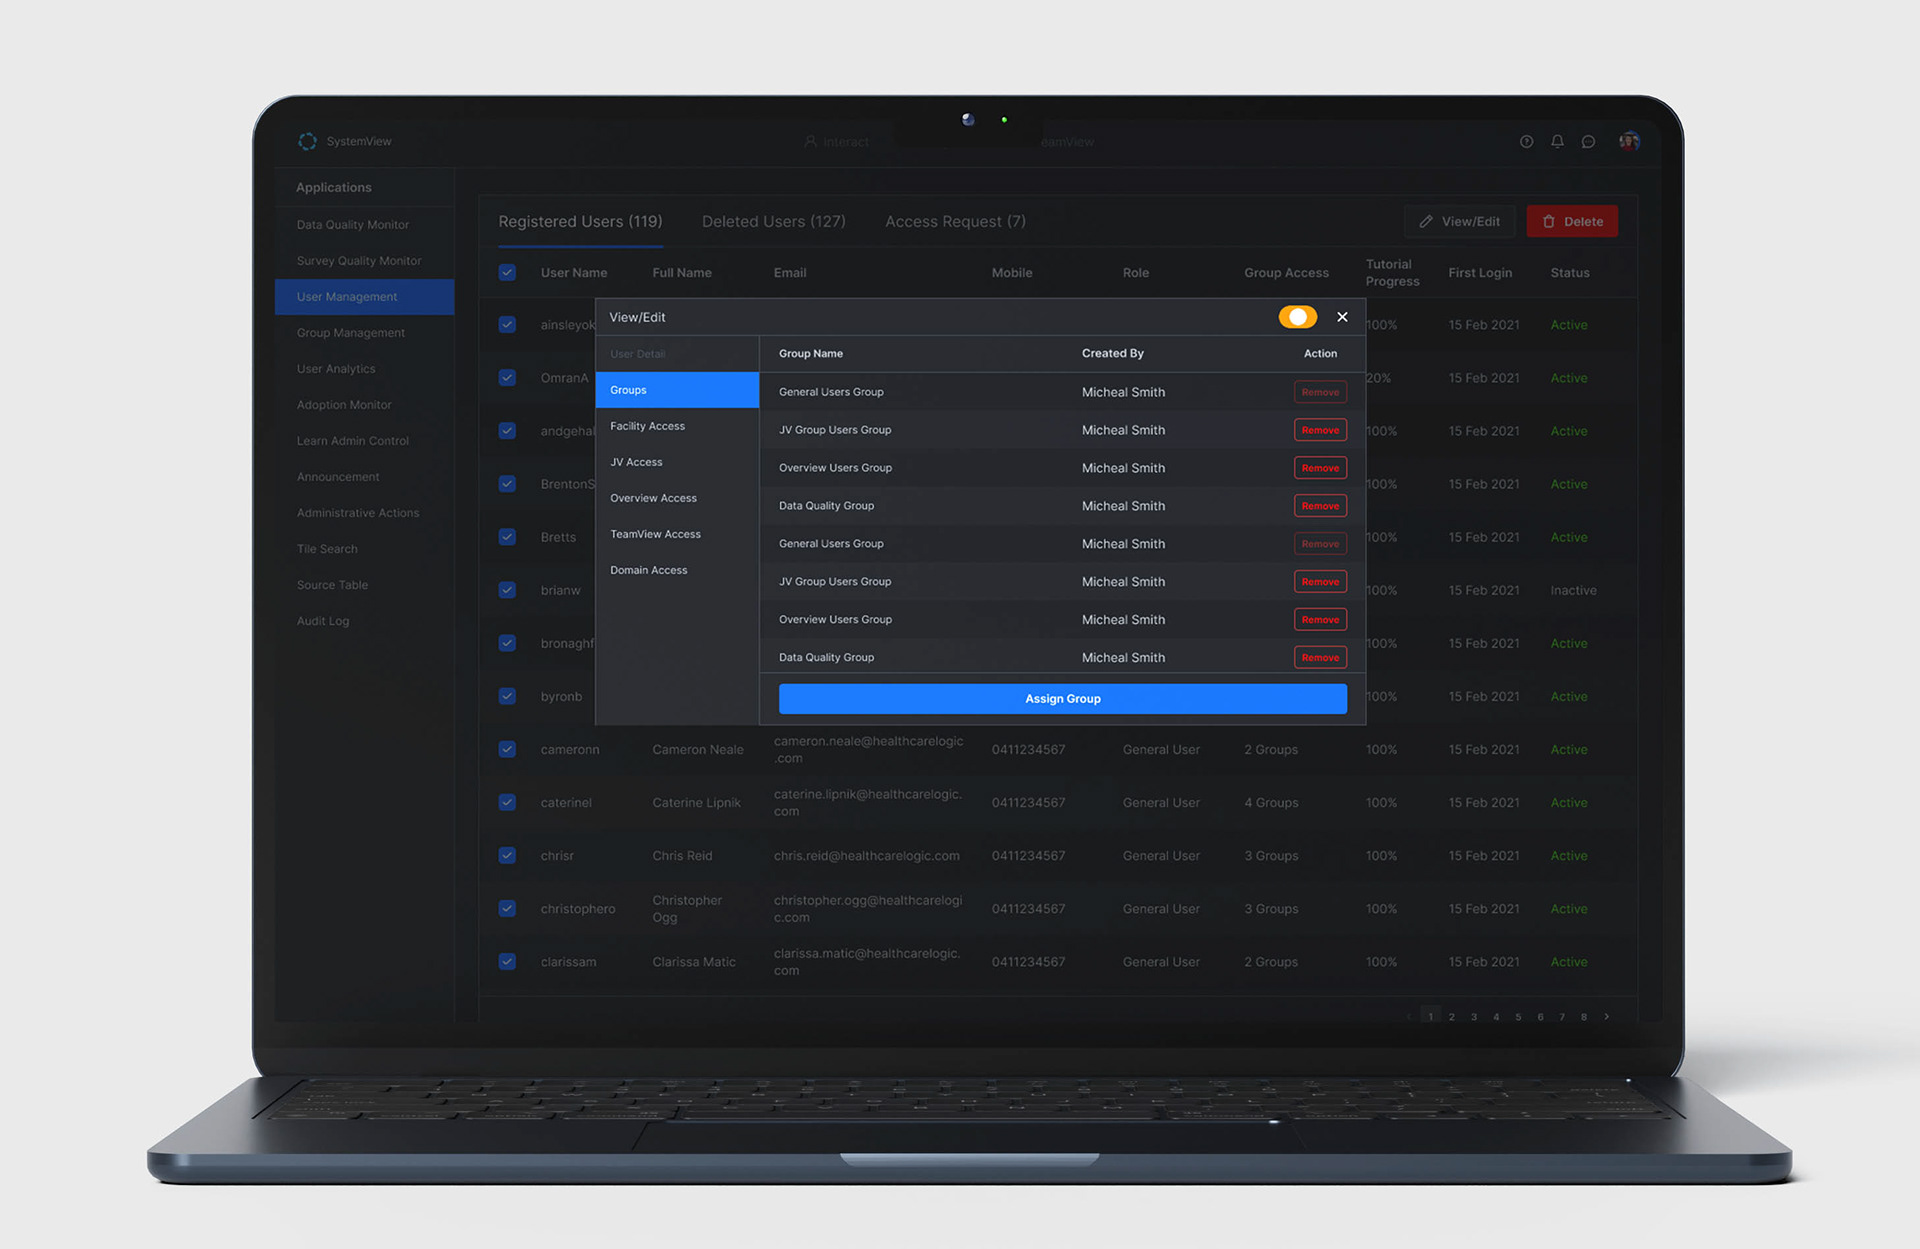
View/Edit popup
1. Enable Multi-Select Functionality: Implement a multi-select feature to allow system and local administrators to update group and facility access for multiple users simultaneously, reducing repetitive tasks.
2. Dynamic Action Buttons: Adjust top-right action buttons based on selection, displaying View/Edit and Delete options only when applicable.
3. Adaptive Popup Design: Configure popups to respond to selection type; for multi-user selections, hide individual user details to simplify the interface.
4. Role-Based Access Control: Restrict local administrators to managing only controls at their level, while higher-level menus created by System Admins remain hidden, ensuring proper access governance.
Benefit: Streamlines user management, reduces errors, and enforces role-based access control.
3. System-Generated Access (Read Only)
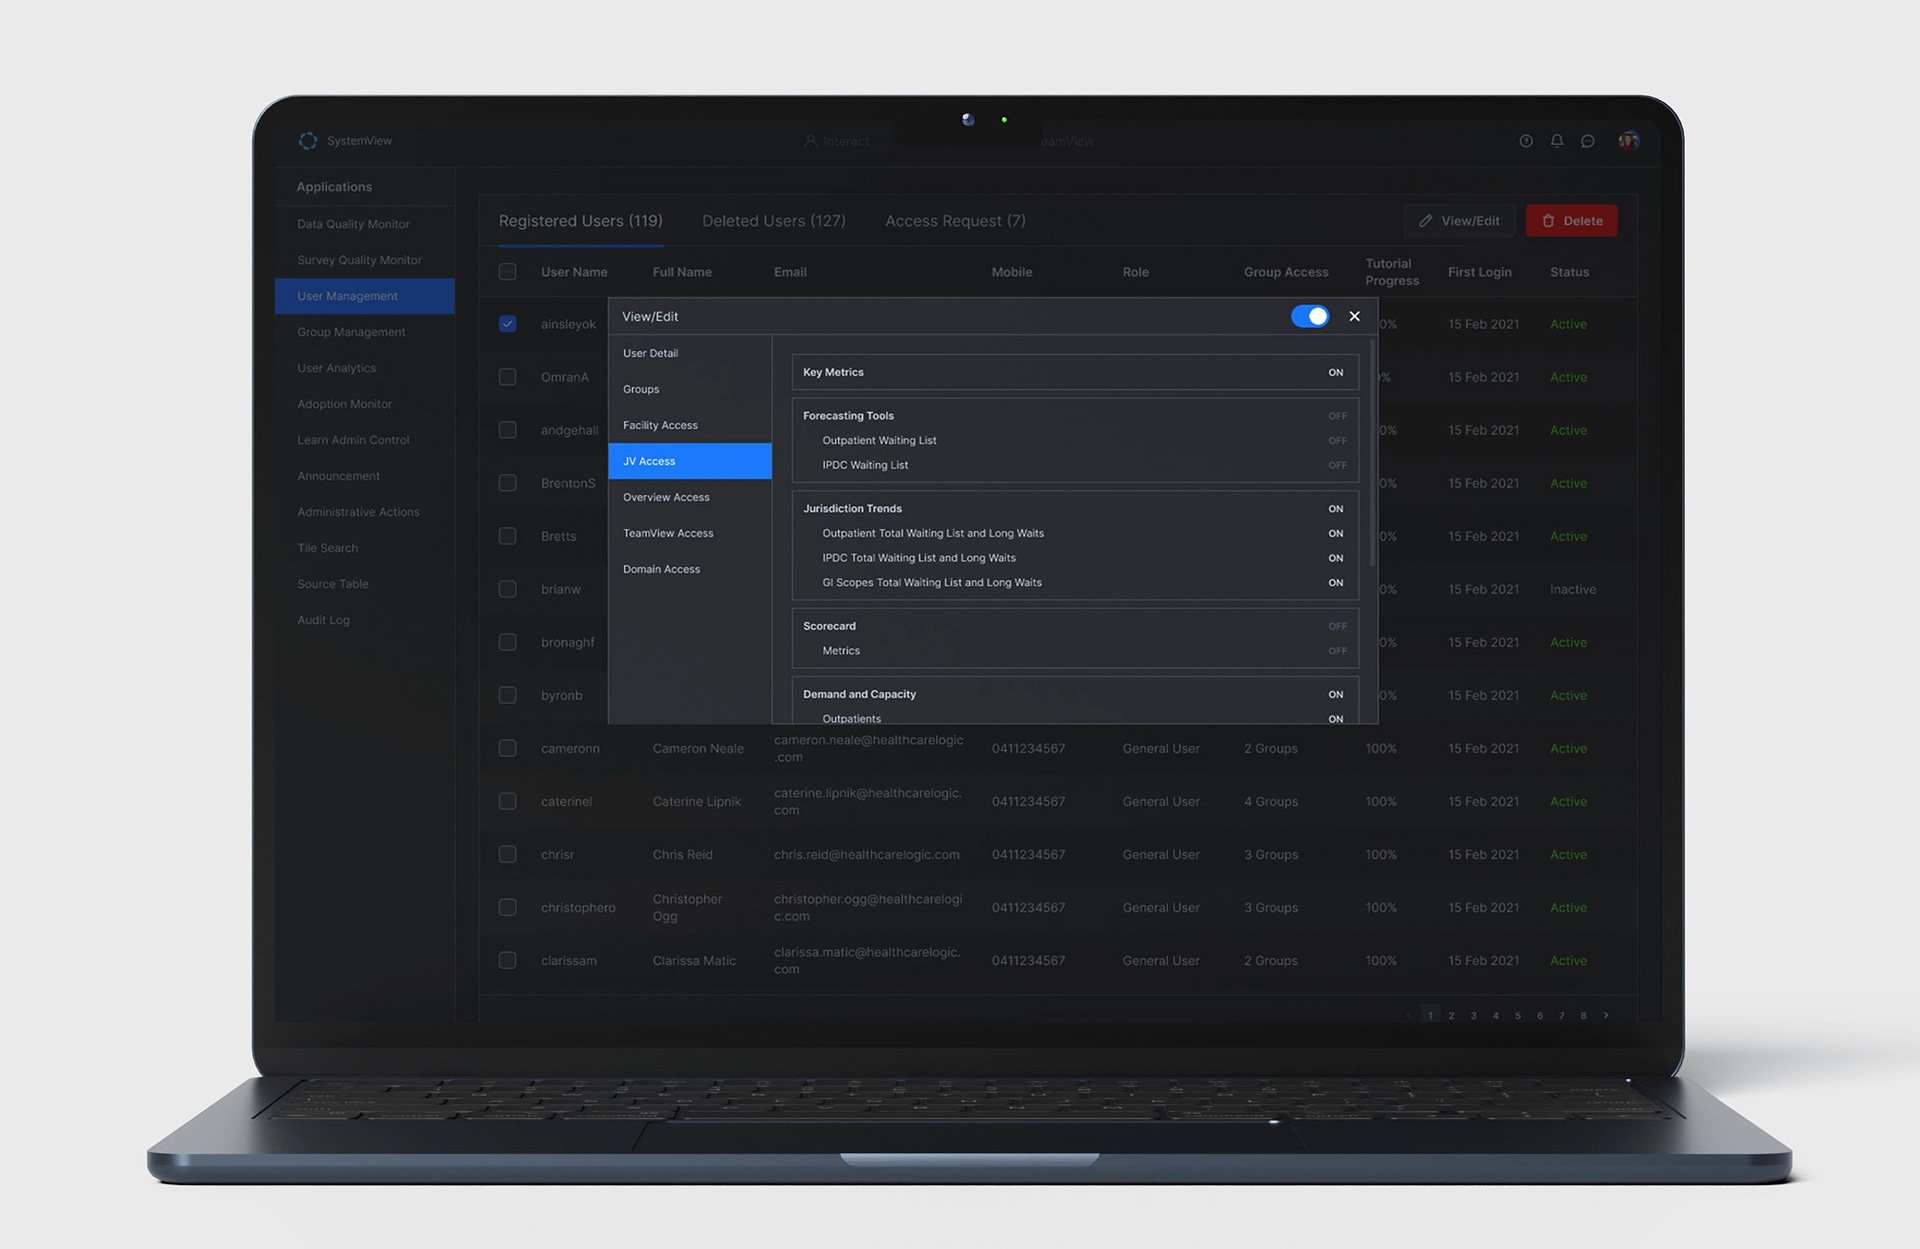
Read-Only Panel Access View
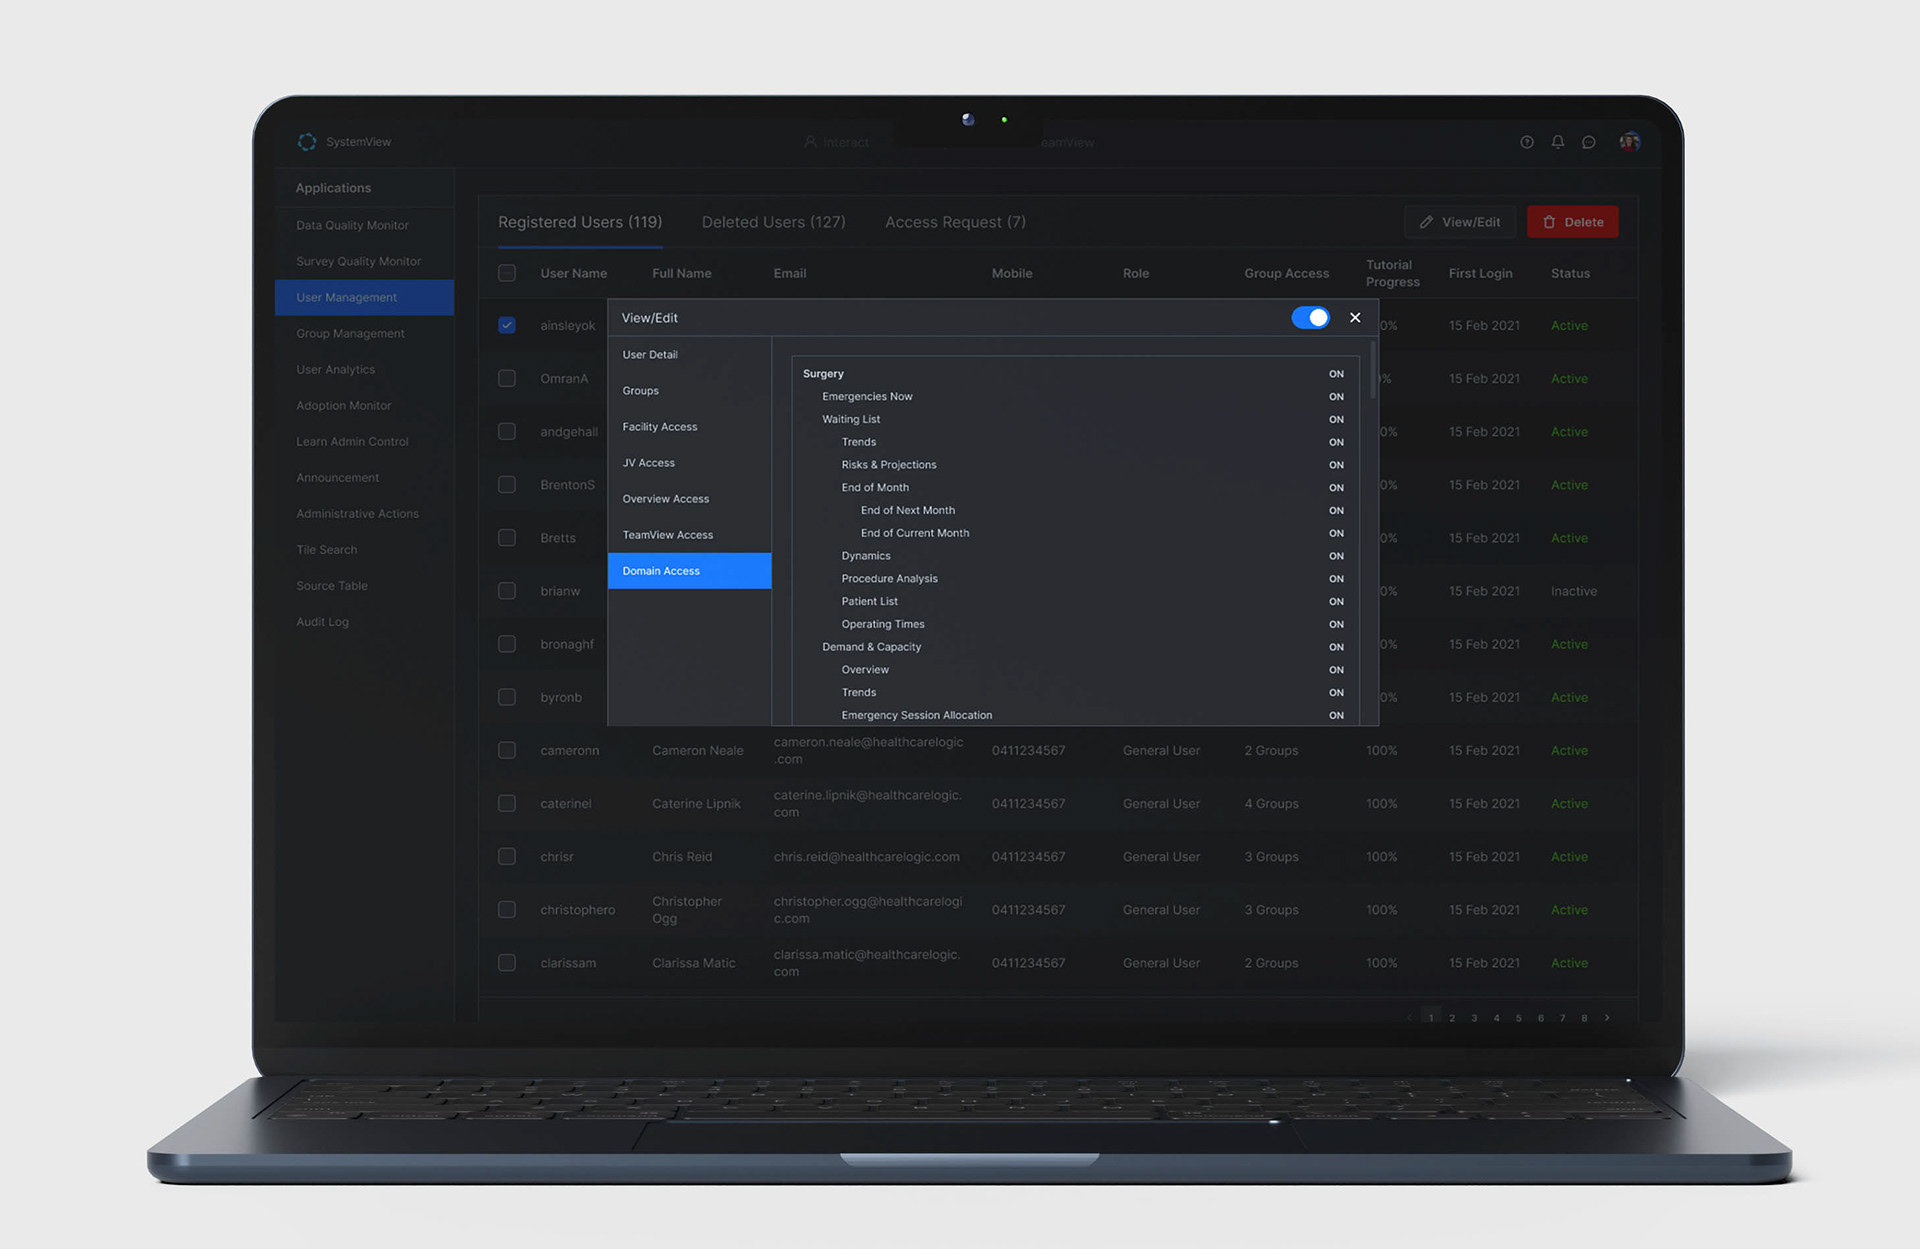
Domain Access Ready-Only View
1. Implement Read-Only Fields: Make all system-generated access rights read-only in the UI to reduce complexity and prevent accidental changes, while still providing full visibility. System Administrators retain the ability to manage these accesses via the administration panel.
2. Simplified Visual Design: Design the view to clearly indicate where each access applies, show hierarchy if relevant, and represent status with a simple On/Off indicator. Use a slightly dimmed colour for Off to enhance visual clarity and quick comprehension.
Benefit: This approach maintains clarity and usability for users while safeguarding system-generated access from unintended modifications.
4. New category, Consolidated Group Management
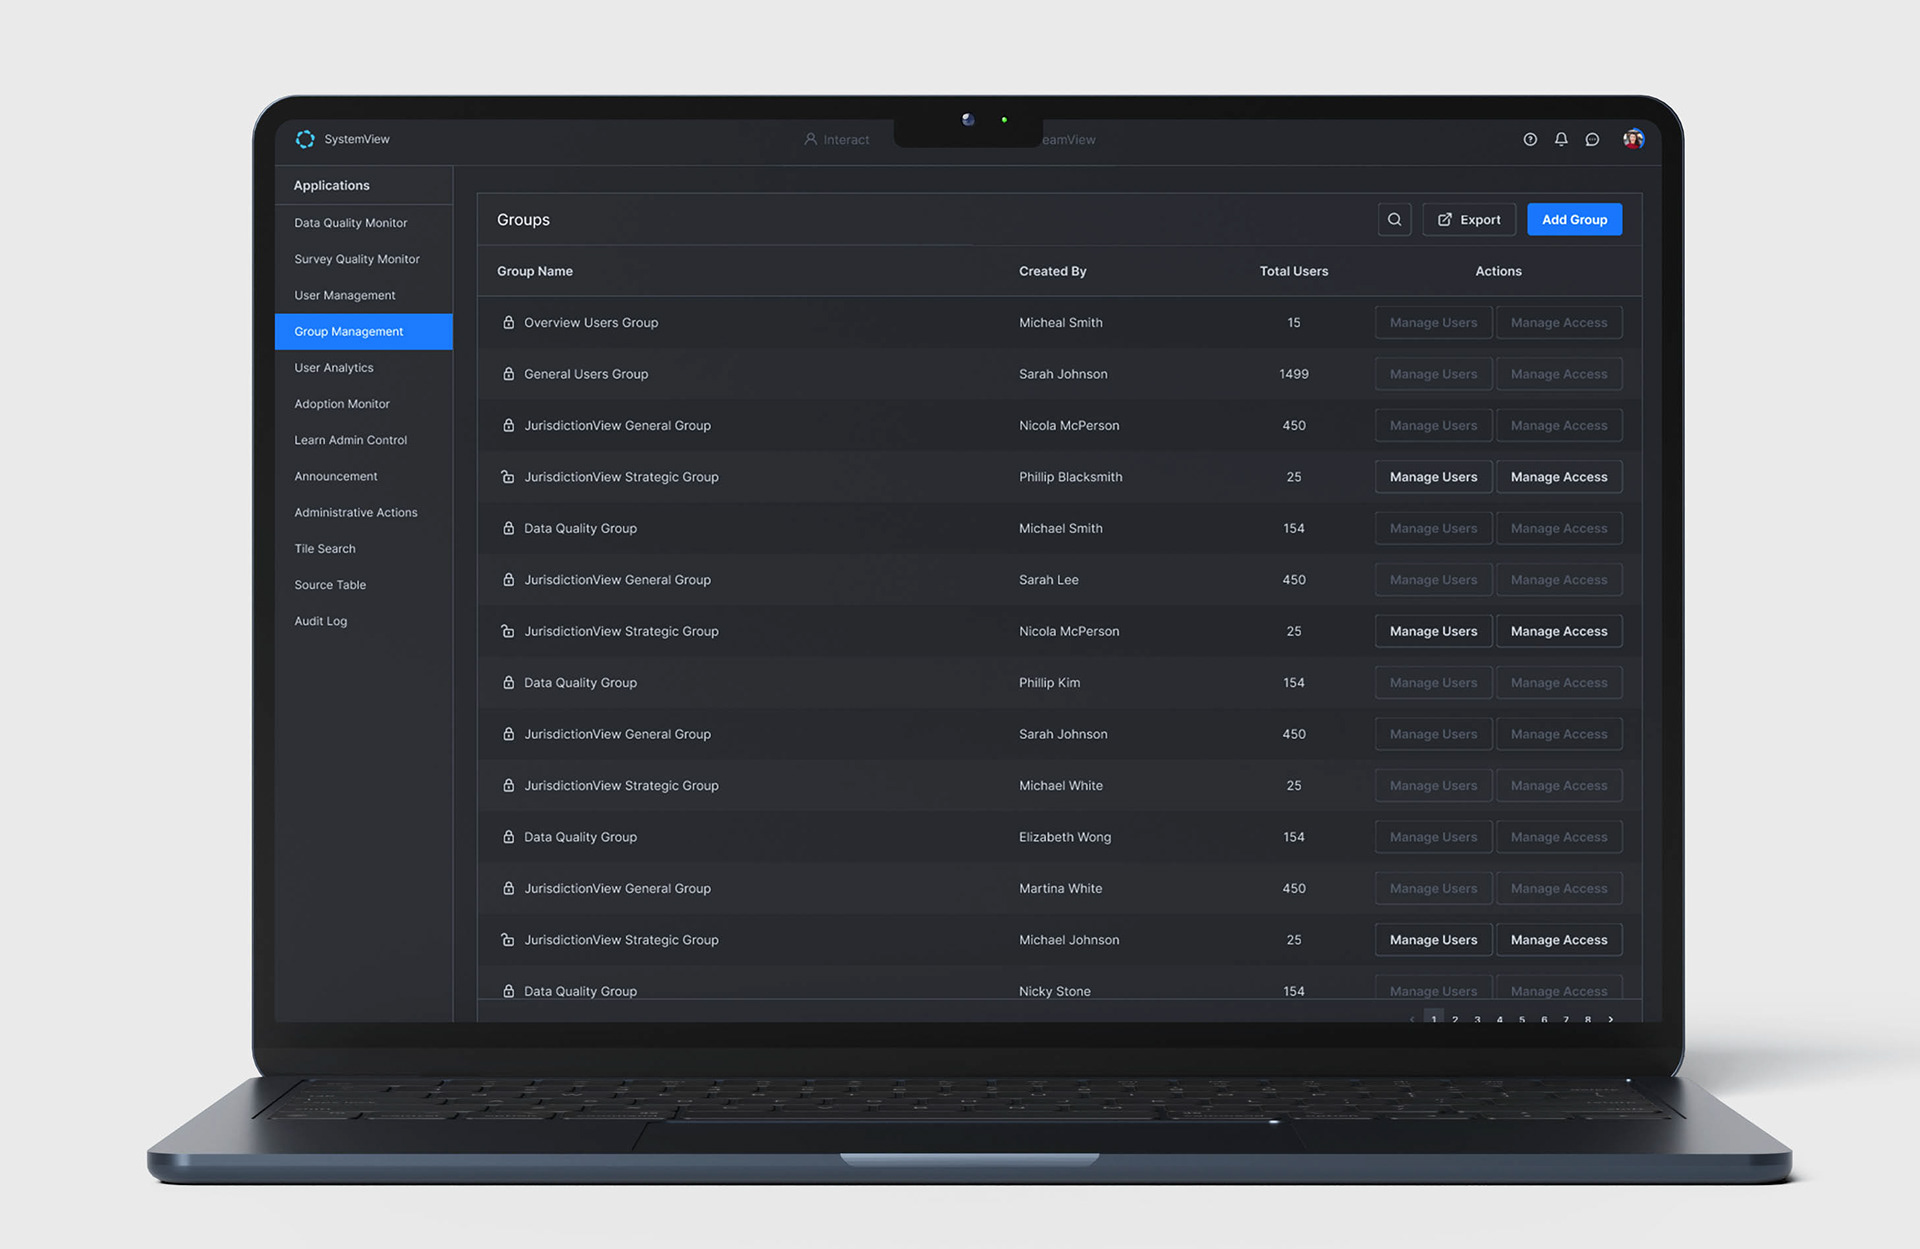
Group Management with Local Admin Access
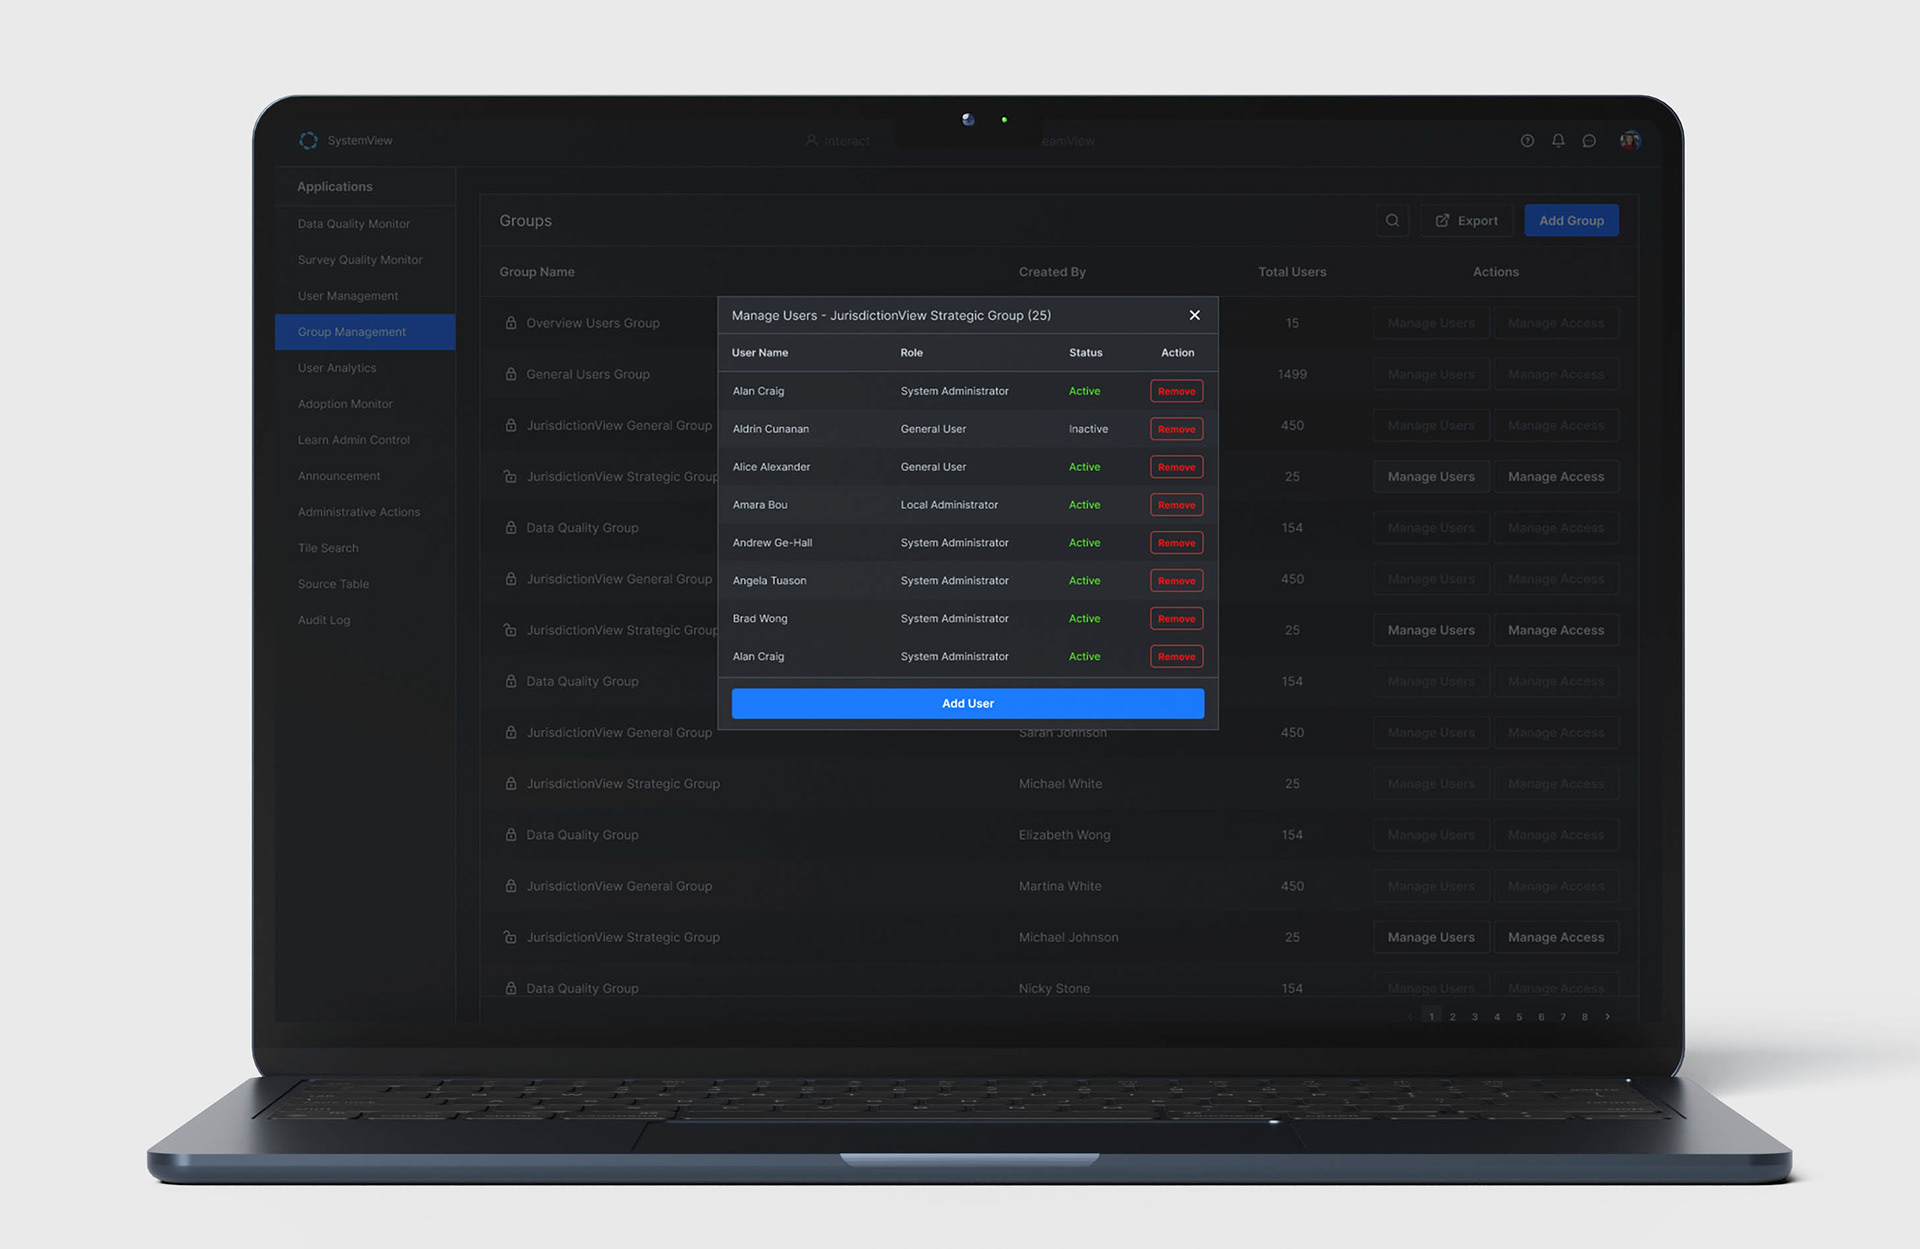
Manage Users for the Group Popup
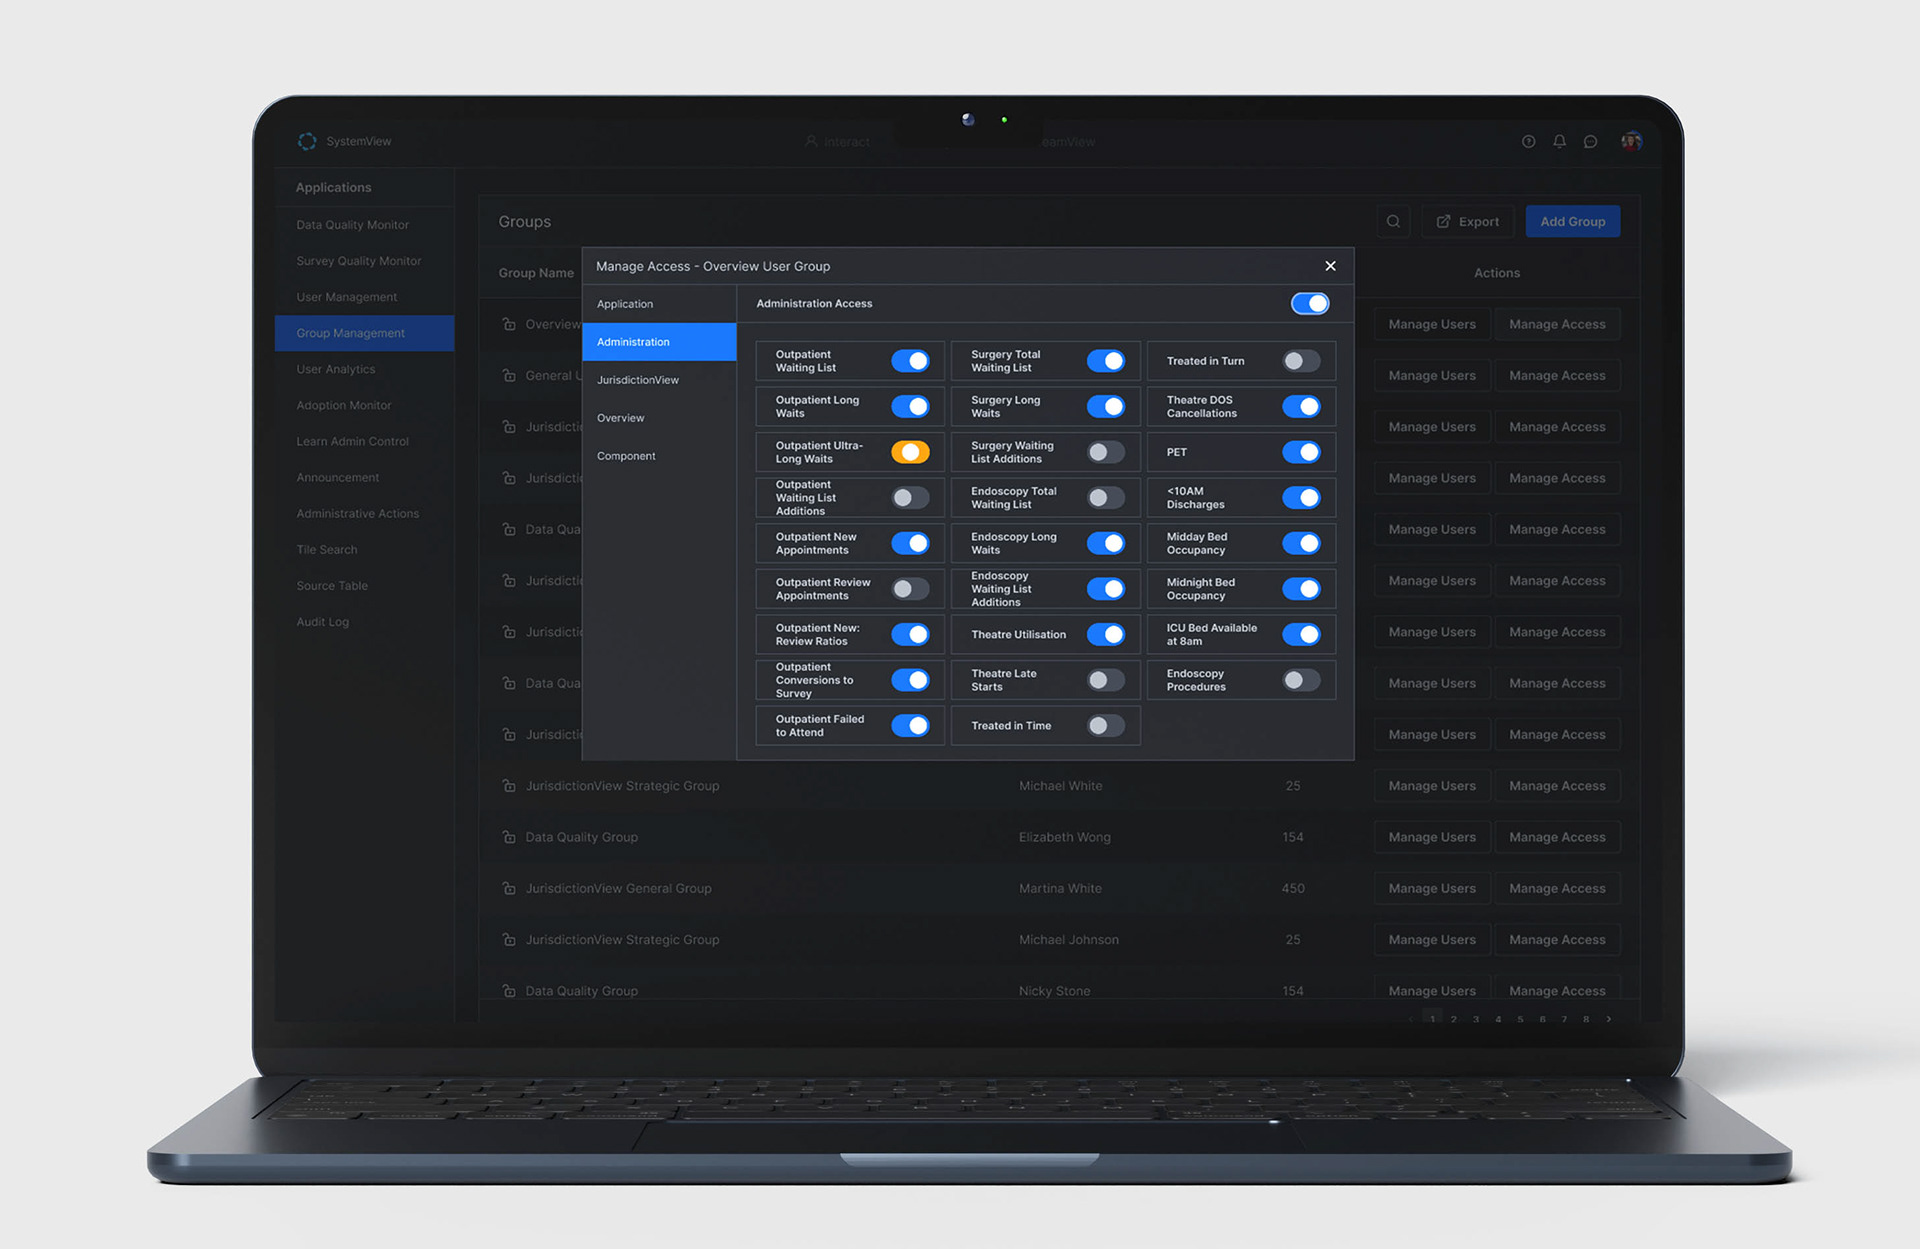
Manage the Access for the Group Popup
1. Separate Group Management: Isolate Group Management from User Management to reduce complexity and improve clarity.
2. Role-Based Access: Restrict access to the Group Management page to System and designated Local Admins only.
3. Manage Group Users and Access: Enable administrators to manage group membership and control which components each group can access.
4. Enforce Authority Levels: Groups created by System Admins cannot be modified by Local Admins, ensuring proper hierarchy and authority.
5. Limit Menu Access: Prevent Local Admins from accessing the Administration and Application menus to maintain security boundaries.
6. Accountability Display: Show the creator of each group so users can identify the responsible administrator.
Benefit: Improves access control, enforces hierarchy, and enhances transparency in group management.
Design constraints and trade-off
Even though these enhancements represent significant improvements, their implementation depends on alignment with stakeholders and the development team. To address this, I have outlined a set of strategies to guide the process and facilitate agreement.
Strategies - "We build the product together. So know it before it is too late"
Understand Strategic Objectives
Ask questions upfront to fully understand the project objectives. This clarity helps define the boundaries for ideation and ensures that proposed solutions align with organisational goals.
Ask questions upfront to fully understand the project objectives. This clarity helps define the boundaries for ideation and ensures that proposed solutions align with organisational goals.
Assess Capabilities and Limitations
Recognise technical and structural constraints of the product. Engaging with the development team to ask detailed technical questions clarifies what is feasible and grounds ideas in reality.
Recognise technical and structural constraints of the product. Engaging with the development team to ask detailed technical questions clarifies what is feasible and grounds ideas in reality.
Define the Technical Problem or Opportunity
Clearly articulate the problem being solved or the opportunity being addressed, along with its significance. Ensure all stakeholders and teams share a consistent understanding.
Clearly articulate the problem being solved or the opportunity being addressed, along with its significance. Ensure all stakeholders and teams share a consistent understanding.
Present Proposed Solutions
Communicate your proposed solution, including the technology and methodology. Be open to feedback, iterate based on input, and refine the solution accordingly.
Communicate your proposed solution, including the technology and methodology. Be open to feedback, iterate based on input, and refine the solution accordingly.
Highlight Benefits
Emphasise the advantages of the proposed solution and how it aligns with technical goals, demonstrating value to both stakeholders and the development team.
Emphasise the advantages of the proposed solution and how it aligns with technical goals, demonstrating value to both stakeholders and the development team.
Address Concerns and Risks
Anticipate potential concerns and risks. Provide solutions or mitigation strategies in follow-up discussions to build confidence and support for the proposal.
Anticipate potential concerns and risks. Provide solutions or mitigation strategies in follow-up discussions to build confidence and support for the proposal.